This shaker card has two separate windows. One for the acetate sheet stamped with buildings from City Scene. The second window has sequins. The windows are made with the rectangle dies for the Make It Market kit: Shakers & Sprinkles. The monster is embossed with Zing!Opaque White Embossing Powder. The patterned paper is from DCWV Indian Summer paper pad. The cardstock is Vintage Cream. The patterned paper frame is inlaid to the card front.
Simon Says Anything Goes : ).
Showing posts with label Monster. Show all posts
Saturday, September 27, 2014
Wednesday, September 24, 2014
Iron Filings
Also known as Eileen Fahleens since Princess Judy Palmer told me about them back in WOYWW Week 268. The easiest method I've found so far is to use these Shake It Pouches by Impression Obsession. And if you have the square set from Spellbinders, one of them fits it almost exactly (varies with the paper/cardstock. This is thicker cardsotck, so I opened it a smidge with the edge of a scissor. The magnet will stick to even a tiny group of iron filings. A really strong magnet is worth the extra cost, the average dollar stores set will not be very much fun at all.
The Shake It Pouches come with adhesive, but Iron Fillings are heavy and tenacious so I use Glossy Accents as a seal instead. Patience is required. Put the pouch upside down, pour in some filings, apply Glossy Accents, apply background cardstock, press the edges together (without picking it up). Set it aside to dry. Really dry lol. Make a cover mat, or cut a window in the card front. The pouches make a much lighter card than making a well out of cardstock.
UPDATED to add: I had no luck just "substituting" iron filings for shaker card ingredients because they are really heavy in comparison and very very small. So the adhesive sheets just didn't work for me. They need to be sealed in with something like Glossy Accents and then make sure there are no gaps : ).
And if you spill any iron filings, wrap the magnet in a coffee filter before you use it to pick them up. then hold it over the jar and remove the magnet. The iron filings fall neatly into the jar without having to be wrestled off the magnet.
These pictures were taken while the card was lying flat on the desk. Fresh from the salon monster.
Bearded Monster.
Rapunzel Monster.
Labels:
card,
DIY Stamp,
Impression Obsession,
Interactive,
Iron Filings,
Magnet,
Monster,
Rubberstamp,
Shake It Pouch,
Technique
WOYWW 277
I've been busy, but I re-charge by stamping out sets in various places, Get Well, Encouragement, Miscellaneous, etc. I love love love the Tim Holtz grid blocks. I've also made a big dent in my stack of unmounted stamps, I believe I'm down to five. I've also been peeling foam backing off a lot of ones I did years ago and replacing it with Aleene's Tack It Over & Over glue.
I had a bit of a scare on Friday, my right hand decided not to co-operate for about a minute.Which required a trip to the hospital for a couple of scans. They aren't sure what happened. I decided not to let that put me off crafting though, and I came up with the following cards earlier this week.
Puppet in a card. With a tutorial on how I change a stationary image into a moveable one. I was especially pleased with this one.
Eileen Fahleens aka Iron Filings. Another favorite with handy dandy construction hints. They both went into my slew of monsters gift bag for one of my friends.
To see more crafty spaces, head over to Julia's Stamping Ground and have a gander at crafty desks around the world.
Sunday, September 21, 2014
It's a Bird! It's a Plane!
It's Super Monster! Simon Says Rock the Technique, and this is one of my favorites. Converting a stationary stamped image into an moveable one. The card is made with Papertrey Ink cardstock. Stamper's Select White for the A2 base. Blueberry Sky for the mat, die cut with the cloud from the Stamp-a-faire 2014 1980's mini kit. One cloud is painted with Picket Fence Distress Paint. The shrub pieces are all hand cut. The large part of the shrub is glued directly to the card. The other two are attached with foam tape. The gnome is a brad from Eyelet Outlet.
It's also a puppet.
The dimension of the shrubbery hides the puppet slot. I sprayed her with Dylusions Spray after all the pieces were cut.
The foam channels are three pieces high. There is a stopper and two sides.
Stamp your image several times. And start cutting rounded pieces. It's better to start with too much on the piece as it can always be trimmed later.
I use a paper piercer to pivot the pieces and swivel marking where the cuts will go.
Poke holes where the brads will go (I used Tim Holtz Mini Brads).
Labels:
1980's mini kit,
Analog Fun,
brad,
card,
Die,
Dimension,
Distress Stain,
DIY Stamp,
Dylusions Spray Ink,
Gnome,
Interactive,
Monster,
Papertrey Ink,
Puppet,
Simon Says,
Technique,
Tim Holtz,
Twofer
Monday, September 1, 2014
Party Animal
Hand-carved monster stamped on DCWV Indian Summer patterned paper and heat embossed with Zing Opaque White Embossing Powder. The hat is hand cut with a border of Milled Lavender Distress Stickles. The balloon animal and the sentiment are from Avery Elle's Party Animal. The balloon animal is covered with glossy accents. The card base is Papertrey Ink Vintage Cream.Simon Says Anything Goes : D.
Labels:
Avery Elle,
Balloon,
Birthday,
card,
DIY Stamp,
Glossy Accents,
Heat Embossing,
Monster,
Papertrey Ink,
Simon Says,
Stickles,
Technique
Wednesday, August 27, 2014
Back to School card
The challenge at Simon Says is Back to School so I made this card for my daughter. I used Papertrey Ink's A Little Inspiration and Black Soot Distress Ink for the sentiment. Versamark, my hand-carved Monster stamp and clear embossing powder over the sentiment and a gold star sequin.
After the Time Travel Stamp-a-faire 2014 at Papertrey Ink this weekend, I've been thinking about tools and techniques I haven't used in a while, so I inked the edges with some Tea Stain Distress Ink. I stamped a notebook page with Papertrey Ink's It's Official and Spring Rain. The cardbase is Summer Sunrise.
Monday, August 25, 2014
Yes! I used my Paper Crimper
The Papertrey Ink Stamp-a-faire 2014Time after Time challenge was to remake a card made some time ago. The card on the left was made for the July 2011 Papertrey Ink Blog Hop.
And it was the perfect card to remake because I got to use my Paper Crimper for the window sheer! I started by cutting a square in the "wall paper"and stamping a view with a stamp from Club Scrap's Destinations kit on the white cardstock where the "window" would go. Then I used my hand-carved Monster stamp which I heat-embossed with black embossing powder. I put the wall paper on the white cardstock and ran some thin vellum through my paper crimper. I made a valence out of the same paper I used from the wallpaper and some foam dots. I die cut the couch and paper pieced the sofa cushions and pillows (stamped with the flower from Botanical Silhouettes. I order to avoid the gap in the cat that I got the first time, I stamp the cat first on the background, then on the sofa and then lined it up. I even paper pieced the picture this time. (Couch, cat and picture are from the On My Couch set also purchased at the CHA 2010 Super Show.
Saturday, August 9, 2014
La Vie en Rose Monster Style
Simon Says Make It Sparkle, so I did. I adhered a piece of Anna Griffin paper to the front of an A2 mat cardstock and then cut the rectangular frame from Make It Market: Shakers and Sprinkles. The pieces were then re-assembled and stamped with my hand carved monster stamp and heat embossed with gold Embossing Powder.
The two outer pieces of the mat were lined up with the A2 Papertrey Ink Ocean Tides card front and the center piece was attached to the card front. A piece of heavy plastic is glued to the bottom of the mat and the opening surrounded by two layers of foam tape. 10 mm gold sequins were added for the shaker. The middle piece will be used in another project, the "frame" is made with the Ocean Tides cardstock showing through where it would have been.
Monday, July 14, 2014
Stomp for Joy
A Stomp for Joy Shaker card using clear acetate cardstock so a second entry in the Simon Says Let's Be Clear Challenge. I was inspired by one of my favorite scenes in Jurassic Park where the water starts shaking as the T-Rex approaches (I keep a glass of water by my bed, it's also useful to see if there is an earthquake). I used my monster stamp on Papertrey Ink Melon Berry patterned paper and Opaque White Zing Embossing Powder. The sentiment is handwritten because I don't have a stamp for that and I'm trying to get over the "ack my handwriting thing".
Here's a close up of the shaker with everything settled. The little lines around the monster are left on the stamp from the carving process. I decided I liked them as they give a sort of "wood block" feeling. The ovals are cut with the Papertrey Ink Make It Market Shakers and Sprinkles kit, and so is the "sugar" used in the shaker.
Thursday, July 10, 2014
Sprinkled with Happiness
This card is for two challenges: this week's Make It Monday #171: Pop Up Die Cuts and Simon Says Start from Scratch. I die cut the word Sprinkles so the bottom of the word opened to rain down sprinkles to make a monster. The "sprinkles" are made from scratch with a glue pen and embossing powder. The monster is also made from scratch by hand-carving, but I finished it last week. The inside of the card says "with Happiness".
Cardstock: Papertrey Ink Vintage Cream (mat) and Limeade Ice (cardbase).
Inks:image pigment (heat embossed with Zing Cricket Embossing Powder) and sentiment Papertrey Ink Ocean Tides.
Dies and Stamps: monster hand-carved stamp, sentiments Papertrey Ink's Make It Market kit: Shakers and Sprinkles..
Wednesday, July 9, 2014
WOYWW 266 and RAK winner
I finally finished my monster stamp and I've been having heaps of fun with it. The two images on the large sheet of paper are watercolor crayons (and spritzed way too heavily lol). The green image in the front is pigment ink which actually took off some of the Walnut Distress Stain that remained after scrubbing the stamp several times. So stamping and extra cleaning in one go lol. The monster cameo card has a lot of things going on and can be read about here if you're curious.
The close up.
The winner of last week's RAK (random act of kindness) is Heather. If you are wanting to see more crafty spaces around the world, head over to Julia's Stamping Ground.
The close up.
The winner of last week's RAK (random act of kindness) is Heather. If you are wanting to see more crafty spaces around the world, head over to Julia's Stamping Ground.
Sunday, July 6, 2014
Cameo Appearance
Lots of white (Simon Says W is for White Challenge) and a cameo appearance using the monster stamp I finally finished carving. I used Papertrey Ink's Background Basics: Woodgrain with clear embossing powder, then made an oval rosette out of cream watercolor paper and the Tim Holtz Rosette die (stretched out in an oval shape). The frame from Papertrey Ink's Simply Jane (stamped with Versamark and embossed with clear embossing powder). The cameo is made with a coral pigment ink (on my monster stamp) and clear embossing powder. I'm also entering this in Papertrey Ink's July Inspiration Archive.
Tuesday, June 24, 2014
WOYWW 264
This week I dyed with something other than Kool-Aid for the first time, and I have to say I am pleased with the results. The skein on the left is a 2 ply (1 corriedale and 1 romney) and the other two are 4-ply cable yarns (2 2-plys are then respun together). I love how the dye was absorbed differently by each type of wool (but I have no idea which is which lol).
I finished my Sending You Sunshine card, and thanks to Nikki C, I got the glitter to show up in the photograph.
It even glows in the dark : ). The details can be read here.
I've also made some headway on the organizational front. I went through about 4 feet of patterned paper and cardstock and managed to find 4 inches I can part with lol. The pads I've decided to keep, I labelled on the adhesive side with a sharpie so it's easier to find what I'm looking for. I still have about 2 feet of paper pads to sort through and a lot of loose paper squirreled away in pizza boxes (ones that never had a pizza near them).
To see more crafty spaces around the world, head over to Julia's Stamping Ground : ).
Labels:
DIY Stamp,
dye,
Glow-in-the-Dark,
handspun,
Monster,
Mouse Stamp,
Organize,
WOYWW,
Yarn
Tuesday, June 3, 2014
You know it was a good day card
Just Jingle made a Dinosaur with Balloons card for Simon Says Anything Goes Challenge. I was positive I had some Dinosaur stamps, but they are well hidden if I do.
I had to make do with a little monster stamp (with teeth drawn in) and a flower crown. I hand cut the speech bubble and stamped it with "You know it was a good day if you didn't Hit or Bite anyone. Nathanial Parizek, Age 4."
Stamps: Recollections: Little Monsters (with teeth drawn in), Inkadinkadoo Kate Harper Designs (wood block stamp)
Inks: Memento Black Tuxedo, Distress Ink Chipped Sapphire
Memento Dual Markers: Lulu Lavender, Angel Pink, Lilac Posies, Rose Bud
Stickles: Cotton Candy, Milled Lavender (Distress Stickles), Crystal
Vintage Cream Papertrey Ink cardstock
Flowers Beyond Birthday flowers leftover from another project, folded to add dimension and attached with a drop of Viva Decor.
Wednesday, April 6, 2011
Put a New Skew on Your Embellishments
Hello everyone! It's time for my guest spot at TheBugBytes :D. I recently discovered my skew button on the Gypsy and what fun I've been having (okay maybe I need to get out a little more, but I sure am having fun in my craftroom).
Basically the skew button can be used to make awesome shadows out of die cuts that don't have awesome shadows. Or if you want an oval and all you have are circles, but today it's about adding a shadow. The shadows can also be used as a journaling mat, but this time it's just decoration.
And it's easy peasy (lemon squeezy). For this embellishment I used the monster from B is for Boy and put two base images and one layer on the screen. Than I highlighted one base image and turned the skew button to -130 and then rotated to 30.00. The rotating just made it easier to cut and have the pattern cut in the direction I felt the shadow should be.
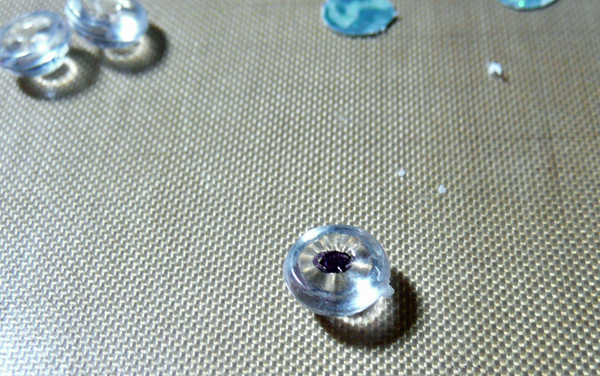
All you need are some clear plastic domes (aka skittles). I found these in the candle department at Michael's and it's a large bag for about $6.00, and I think I used a coupon. They are labelled Decorative Accents. To make customized eyes, just use a regular hole punch and cut out some holes saving the little circles. These fit under the skittles perfectly.
Then just use a black marker or Sharpie in the little bubble at the bottom.
Put a drop of Glossy Accents or other clear drying glue on the circle than pop the flat side of the skittle on top of the circle and let dry. Of course you can also make them without the dots for regular embellishing.
Labels:
B is for Boy cart,
Cricut,
Embellishment,
Guest Designer,
Gypsy,
Hole Punch,
Monster,
Scrapbook Layout,
Skew,
Technique
Subscribe to:
Posts (Atom)


