I've been working on this page a while
(2015), but I THINK it's done. The journaling is finished! I love
altering photographs, but never the originals. I scan the originals and
then print out a new one. I also love twisting the expectation
with a contrasting first glance and the actual subject matter.
I
added a die cut indicating the journaling is pulled out using a little
arrow from Papertrey Ink's Movers & Shakers Sentiments set. I die
cut a scrap of glossy paper and stamped the background with Papertrey
Ink's Monthly Moments: Tabbed set.
I might add a couple more F Bombs from Kelly Purkey's F Bomb set.
Paper: Anna Griffin, 12x12 vellum, Papertrey Ink Sweet Blush cardstock, Vintage Glassine (for postage stamp collecting).
Stamps:
Papertrey Ink Honey Bees, Monthly Moments: Tabbed, Movers & Shakers
Sentiments, Simple Alphabets; Kelly Purkey F Bomb
Cricut:
Cricut Explore doesn't show which images were used. No idea about the
Vellum, letters, speech bubble, and the beetle. The toads are from
Spells & Potions.
Miscellaneous: Stickles, Handsput
Silk Embroidery Thread (used to stitch translucent pieces in place),
Deckle edged scissors (for Journal Pocket), White Opaque Embossing
Powder, Glossy Accents
There is something so satisfying about making embellishments : D. This little toad is one of my all time favorites.
Showing posts with label Die. Show all posts
Wednesday, May 2, 2018
Wednesday, March 28, 2018
Snowfolk, Birthday Flower Wearing Style
A shaped birthday card for someone who loves snow folk. And because I'm so ready for spring. I cut two snow folk with Papertrey Ink's Shape Up: Snowman die.
The face is stamped with the matching stamp set. The wreath is die cut from the Make It Market kit: Garden Gate, The tulips are cut from the MIM kit: Market Street. The cake is made with the Tremendous Treats: Birthday set. The cake is colored with Vintage Photo and Scattered Straw Distress Markers and the candles and plate are colored with Cracked Pistachio. The candles have a tiny dot of Xmas Stickles and Mustard Seed flame and glow. The arms are colored with Gathered Twigs spritzed with water.
I added a bit of dimension by shaping the flowers of the wreath before gluing them (Tombow Multi Glue). The cake has 2 layers of foam tape. The hands are glued to the cake and the arms to the body.
The second die cut is just large enough for this sentiment from Offbeat Birthday.
And I included a Wallet Size Magnifier : D.
I have the most success die cutting stamped images with a closed die by saving the remainder of a diecut and lining up the stamped image on a cutting plate, and then fitting the die into the template. I am a HUGE fan of Tim Holtz' Sizzix Sidekick for cutting all the little things right at my desk.
The face is stamped with the matching stamp set. The wreath is die cut from the Make It Market kit: Garden Gate, The tulips are cut from the MIM kit: Market Street. The cake is made with the Tremendous Treats: Birthday set. The cake is colored with Vintage Photo and Scattered Straw Distress Markers and the candles and plate are colored with Cracked Pistachio. The candles have a tiny dot of Xmas Stickles and Mustard Seed flame and glow. The arms are colored with Gathered Twigs spritzed with water.
I added a bit of dimension by shaping the flowers of the wreath before gluing them (Tombow Multi Glue). The cake has 2 layers of foam tape. The hands are glued to the cake and the arms to the body.
The second die cut is just large enough for this sentiment from Offbeat Birthday.
And I included a Wallet Size Magnifier : D.
I have the most success die cutting stamped images with a closed die by saving the remainder of a diecut and lining up the stamped image on a cutting plate, and then fitting the die into the template. I am a HUGE fan of Tim Holtz' Sizzix Sidekick for cutting all the little things right at my desk.
Sunday, March 25, 2018
Papertrey Ink March 2018 Blog Hop
My take on the Papertrey Ink March 2018 Blog Hop. I started by cutting out the middle of one of the papers from the Nostalgic Notions Make It Market kits. Everything else comes from Forest Floor: Spring. The mat the sentiment is stamped on was stamped in Spring Rain first, then blended with an Aqua Brush. Then stamped again with Blueberry Sky. I only glued the sides and bottom to make the mat a pocket.The sentiment was stamped with Gathered Twigs Distress Oxide.
The ferns were stamped with Bundled Sage Distress Oxide, the Snowdrop and Lily of the Valley stems were stamped with Forest Moss Distress Oxide. The Snowdrop flowers were stamped in Spun Sugar Distress Ink and the Lily of the Valley flowers were stamped with Tattered Rose Distress Oxide.
Tuesday, March 20, 2018
My Dog Susie
Most of my childhood was documented in slides. A small handful resurfaced, and thanks to a handy dandy slide scanner they now exist digitally as well : D. This is a picture of my first dog, Susie. She was adorable, and I can't tell now if this was a puppy picture or a grown picture.
Another layout inspired by Altenew Academy's Stamps Meet Scrapbook Scrapbook class. The green and blue papers are from the Reflection kit. The white cardstock is Papertrey Ink's Linen cardstock which has a lovely subtle texture. The flowers are from Altenew's Frosted Garden set.
I used Papertrey Ink's Stitched Coasters die to make a stitchable square to make it easier to find Susie in the picture and stitched a frame in the photo using 2 strands of DMC 4075, one strand of DMC Gold Metallic and one strand of handspun 2ply Merino top. The mat is stamped repeatedly with one of the stamps from Papertrey Ink's Limitless Labels. The nugget wrapper shows what it looks like when it is only stamped once.
Another layout inspired by Altenew Academy's Stamps Meet Scrapbook Scrapbook class. The green and blue papers are from the Reflection kit. The white cardstock is Papertrey Ink's Linen cardstock which has a lovely subtle texture. The flowers are from Altenew's Frosted Garden set.
I used Papertrey Ink's Stitched Coasters die to make a stitchable square to make it easier to find Susie in the picture and stitched a frame in the photo using 2 strands of DMC 4075, one strand of DMC Gold Metallic and one strand of handspun 2ply Merino top. The mat is stamped repeatedly with one of the stamps from Papertrey Ink's Limitless Labels. The nugget wrapper shows what it looks like when it is only stamped once.
Thursday, September 21, 2017
Embedded Object Page
Day 7 from the creativebug book art class. The two sides are also stitched together with pierced holes and handspun chain-plied cinnamon tussah silk embroidery thread. Ends left for an interactive elements since the dur-a-lar prevents the perforated paper from being touched.
There are a few drops of gold paint for a little extra shine : D.
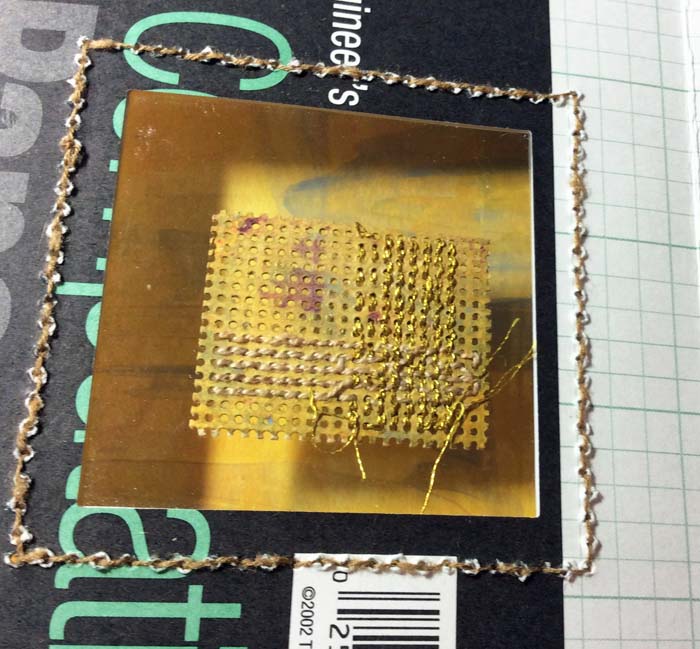
I started with a little piece of perforated paper that has been on my desk for a couple of years. I started painting it with paint I had left on my desk when I was coloring background papers. This was the front.
Until I turned it over. Now this is the front.
I stitched the perforated paper some Pearl Cotton and DMC Gold Metallic floss. I liked both sides so I decided to make two pages that worked together so both sides could be seen. The windows were cut with the square from Papertrey Ink's Limitless Layers: 2 1/4 Square die.
The back can be seen on the next page. I used the square cut from the paper to fill in the hole on this page. The piece is seen against the same background no matter which side is looked at.
I love being able to see the shadows cast too.
There are a few drops of gold paint for a little extra shine : D.
I started with a little piece of perforated paper that has been on my desk for a couple of years. I started painting it with paint I had left on my desk when I was coloring background papers. This was the front.
Until I turned it over. Now this is the front.
I stitched the perforated paper some Pearl Cotton and DMC Gold Metallic floss. I liked both sides so I decided to make two pages that worked together so both sides could be seen. The windows were cut with the square from Papertrey Ink's Limitless Layers: 2 1/4 Square die.
The back can be seen on the next page. I used the square cut from the paper to fill in the hole on this page. The piece is seen against the same background no matter which side is looked at.
I love being able to see the shadows cast too.
Sunday, February 19, 2017
Celebrating Papertrey Ink: 2009
Simon Says use your favorite tool, so I did (BigKick) : ). Simon also Says Fantastic Florals, so I did that too
Tuesday, February 14, 2017
Garden Gate Birthday Card
A gate fold birthday card, featuring a gate on the front made almost entirely from elements in Papertrey Ink's Make It Market kit: Garden Gate. The only bit of stamping in the entire card is the paper before the gate was cut. Stamped with Fine Linen and blended with Frayed Burlap Distress Ink. The front of the gate fold before the lattice and gate were attached is stenciled with leafy Garden Gate stencil and Mowed Lawn Distress Ink. The sign and flowers are cut from printed sheets included in the kit.
The stenciled non-embellished side of the gate fold.
The inside shows the printed card base with the mailbox and removeable letter (which contains a birthday message) from the Make It Market kit: Post & Parcel with more floral embellishments from Garden Gate.
Simon Says Use Your Favorite Tool (BigKick), so I did : ).
The stenciled non-embellished side of the gate fold.
The inside shows the printed card base with the mailbox and removeable letter (which contains a birthday message) from the Make It Market kit: Post & Parcel with more floral embellishments from Garden Gate.
Simon Says Use Your Favorite Tool (BigKick), so I did : ).
Saturday, December 31, 2016
Stationery Wedding Gift
Another hand-stamped and stenciled stationery set. The inspiration comes from the wedding invitation (behind the stationery sheet).
Because I'm only using one stamp, I just used my Tim Holtz Grid Block aligning it at the top of the sheet and the lines made it easy to center the stamp. The stamp is from Papertrey Ink's Damask Designs set. It took me a few months to find the right greens (Limeade Ice and Prairie Grass inks from Papertrey Ink and Pine Needles Distress Ink for the stenciling). I got the variegated effect by inking the stamp with Limeade Ice and then dabbing the edge of Prairie Grass over the top of the first ink. I also stamped 2 1/4 inch adhesive paper circles for a decorative envelope seal.
Papertrey Ink has a Deluxe Stationery kit with paper, envelopes, adhesive sheets and a small container (I put the envelope seals in this). So easy to decorate. And then the paper and the envelopes fit so nicely into one of the Basic White Stationery Boxes. I attach patterned paper and a piece of cardstock decorated like the stationery to the box top.
I wanted to make a customized stencil that was at least translucent to ensure proper placement of the initials and found Papertrey Ink's Vellum to be sturdy enough for the job. I was really surprised to find that the Distress Ink was smudge proof after a few hours. That definitely needs more experimenting. The vellum is white, the picture was taken after I had used a blending tool over it a few times : D.
This is the second Monogrammed Stationery set I've given a young newlywed couple. I told them they could either write letters to each other or write other people. I don't know if I'm #analog or #Luddite lol.
Because I'm only using one stamp, I just used my Tim Holtz Grid Block aligning it at the top of the sheet and the lines made it easy to center the stamp. The stamp is from Papertrey Ink's Damask Designs set. It took me a few months to find the right greens (Limeade Ice and Prairie Grass inks from Papertrey Ink and Pine Needles Distress Ink for the stenciling). I got the variegated effect by inking the stamp with Limeade Ice and then dabbing the edge of Prairie Grass over the top of the first ink. I also stamped 2 1/4 inch adhesive paper circles for a decorative envelope seal.
Papertrey Ink has a Deluxe Stationery kit with paper, envelopes, adhesive sheets and a small container (I put the envelope seals in this). So easy to decorate. And then the paper and the envelopes fit so nicely into one of the Basic White Stationery Boxes. I attach patterned paper and a piece of cardstock decorated like the stationery to the box top.
I wanted to make a customized stencil that was at least translucent to ensure proper placement of the initials and found Papertrey Ink's Vellum to be sturdy enough for the job. I was really surprised to find that the Distress Ink was smudge proof after a few hours. That definitely needs more experimenting. The vellum is white, the picture was taken after I had used a blending tool over it a few times : D.
This is the second Monogrammed Stationery set I've given a young newlywed couple. I told them they could either write letters to each other or write other people. I don't know if I'm #analog or #Luddite lol.
Labels:
Alphanumerics set,
Damask Designs,
Die,
Distress Ink,
Gift,
Papertrey Ink,
Rubberstamp,
Stationery,
Stencil,
Technique,
Tim Holtz
Thursday, October 13, 2016
A Gender Neutral Card : )
A gatefold card made for Online Card Classes Wild Card. The card base is Papertrey Ink's Ocean Tides, stamped with the foliage stamp from Friendship Jar: Flowers set with Fine Linen ink. The flowers are cut from one of the small dies in the Friendship Jar: Flowers set out of patterned vellum. The hearts are Limitless Layers: Heart Stitches cut from Classic Kraft and the plane is Tim Holtz' Mini Airplane covered with a technique from Creative Chemistry 103 (also on Online Card Classes).
The gatefold opened. Simon Says Global Exploration, so it's there as well.
Monday, October 10, 2016
Poe with Gold and Vellum
A card made for Papertrey Ink's Make It Monday #263: Background Building with Frames. I started with Ocean Tides cardstock and added the frame die cut from Tag Sale #10 cut from a gold foil adhesive. The vellum is cut with Friendship Jars: Flowers (2 times) and is adhered to the card under the focal point with Ranger Matte Multi Medium. I love how the light reflecting off the frames catches in the vellum. The focal point is the Poe stamp from Wendy Vecchi's Metro Art stamp set (fussy cut, Tim Holtz collage crazing medium with a little Distress Crayon worked into the crazing). I had made this a few months ago and it was just waiting on my desk for the perfect project : D.
Simon Says Halloween Inspiration, and since Poe always reminds me of Halloween, I'm entering it there as well : D.
Thursday, October 6, 2016
Stitched Ornament (a small study in contrast)
I love experimenting in contrasts. In this case, glassine from my late father's stamp collection (postage) cut with Papertrey Ink's Stitched Ornaments: Topped dies and stitched together with Rustic Twine. I also love that the twine is the support for the structure, and how the very opaque and sturdy rustic twine contrasts against the translucent, and fragile glassine.
It does take a bit of concentration to make sure the stitching is done slowly and deliberately. It helps to use a rounded tip needle too. Projects like this one which require and slow and deliberate pace create a meditative space for me. And the crinkle of the glassine reminds me of my father turning the pages in his many stamp albums (a sheet of glassine between each page of stamps). In many ways, one of my first introductions to paper crafting.
Labels:
Die,
Glassine,
hand stitched,
Ornament,
Papertrey Ink,
Stitched Ornaments: Topped,
Technique,
Twine
Sunday, September 25, 2016
Papertrey Ink September 2016 Blog Hop
It's Papertrey Ink's September Blog Hop. The frame is made with the medium String Frame die, and strung with Rustic Twine. The tag is cut with Fillable Frames #9 and stamped with Make It Market: Don't Forget to Write and a stamped off image from Woodblock Prints in Dark Chocolate. The cardbase is Classic Kraft.
It is also in keeping with this week's CASology's cue card, so I'm adding it there as well.
Sunday, September 18, 2016
Bark
This week's CASology cue card is bark. So I used a Papertrey Ink Sweet Speech die and cut a photograph of the bark of a maple tree. I drew a bit of ground with a pencil and used a die cut from Papertrey Ink's Come All Ye Faithful set.
And Simon Says Clean and Simple, so it's there as well : D.
Tuesday, July 19, 2016
Vitamin Sea
I'm participating in Creative Chemistry 2016 and the background is one of the techniques from Chemistry 102. I am beyond giddy that I can make my on glossy paper tags with the Tim Holtz Tag & Bookplates die (and Glossy Paper). The woman in the water (at the bottom of the tag), the sentiment on the side, and seahorses are from Crafty Secrets Mermaids stamp set. The Octopus and Jellyfish are from Hero Arts My Monthly Hero kit from July 2016. The protractor stamp is from Jenni Bowlin Studios. The sentiment is from Tim Holtz' Boundless Flight and the chandelier is from a set by Inkadinkadoo.
Simon Says Nautical/By the Sea, so it is : D
Hero Arts also made a Color Layering Octopus stamp set.
I'm also addicted to making these little seahorses with crackle paint (seriously it is Crack). These are all made from Tim Holtz Movers & Shaker dies cut from the backs of thick cardboard (the back of product packaging with the shiny top layer peeled off).
Hoping you get your fix of Vitamin Sea this summer : ).
Simon Says Nautical/By the Sea, so it is : D
Hero Arts also made a Color Layering Octopus stamp set.
I'm also addicted to making these little seahorses with crackle paint (seriously it is Crack). These are all made from Tim Holtz Movers & Shaker dies cut from the backs of thick cardboard (the back of product packaging with the shiny top layer peeled off).
Hoping you get your fix of Vitamin Sea this summer : ).
Saturday, May 14, 2016
Graduation Party Invitation
The card base is Papertrey Ink's Fresh Snow Linen cardtock, the diecuts are Stamper's Select White (Mat Stack 1 and For the Graduate). The stamp sets used are For the Graduate and Just the Ticket.
Monday, April 18, 2016
Papertrey Ink April 2016 Create Along With Us Challenge
I finally tackled the Movers & Shakers: Sliders die, and once I actually had them in my hands (after watching Nichole's video), it was Easy Peasy. Stamping the card front and THEN diecutting the top part of the slider works much better than cutting and trying to stamp (just saying lol). I used Spring Rain cardstock for the front stamped with Rainy Day Sentiments with Enchanted Evening for the large drops and Aqua Mist for the smaller. The cloud and Sun are only attached in the middle for extra dimension.
When the ribbon is pulled it pops up the top of the focal point and exposes the slider which is stamped with the solid block from Building Blocks with "We'll be friends until we're old and senile. Then we'll be new friends." written on it.
The focal point base is Stamper's Select White and the Scene It: Skyscapes (cloud and sun) are cut out of Fresh Snow Linen cardstock. The clouds are painted with Stormy Sky Distress ink and the Sun is painted with Bright Buttercup and Orange Zest. I scored it right at the point that the sun meets the horizon and attached it to the slider at the bottom fold. I stamped the ribbon pull with a pull here sentiment from Movers & Shakers: Sentiments set and is attached to the slider tab with two tiny attachers colored with Ranger Gold Pigment Alcohol Ink. The sentiment is stamped on vellum Fillable Frames #5 stamped with Stazon. It is attached with a line of Tombow Multi behind the "behind".
For this month's Create Along With Us Challenge, I was inspired by this card made by Heather Nichols cards for the Papertrey Ink April 2016 release
The Mixed Media Monthly Challenge is Dimension, and Simon Says Let's Do the Polka, so I'm including it there as well.
When the ribbon is pulled it pops up the top of the focal point and exposes the slider which is stamped with the solid block from Building Blocks with "We'll be friends until we're old and senile. Then we'll be new friends." written on it.
The focal point base is Stamper's Select White and the Scene It: Skyscapes (cloud and sun) are cut out of Fresh Snow Linen cardstock. The clouds are painted with Stormy Sky Distress ink and the Sun is painted with Bright Buttercup and Orange Zest. I scored it right at the point that the sun meets the horizon and attached it to the slider at the bottom fold. I stamped the ribbon pull with a pull here sentiment from Movers & Shakers: Sentiments set and is attached to the slider tab with two tiny attachers colored with Ranger Gold Pigment Alcohol Ink. The sentiment is stamped on vellum Fillable Frames #5 stamped with Stazon. It is attached with a line of Tombow Multi behind the "behind".
For this month's Create Along With Us Challenge, I was inspired by this card made by Heather Nichols cards for the Papertrey Ink April 2016 release
The Mixed Media Monthly Challenge is Dimension, and Simon Says Let's Do the Polka, so I'm including it there as well.
Friday, March 25, 2016
March 2016 Papertrey Ink Blog Hop
Today is Papetrey Ink's March 2016 Blog Hop. I stitched "hello" using Papertrey Ink's Quick Stitch Sentiments hello die in Rustic Cream Twine (more visible in person, especially because of the texture). The pattern is stamped with lots of flowers from Peonies On Parade, then colored with Distress Markers (Spun Sugar, Tattered Rose and Squeezed Lemonade) then masked and stamped with the lace stamp from Waltzingmouse Stamps Faux Fun with Ranger Coffee Archival Ink, then the background was painted with Stormy Seas ink smooshed on nonstick craft mat applied with an aqua brush.
Sunday, March 20, 2016
Spring is in the Air
The base is Papertrey Ink's Stormy Sea stamped with the ticket from Tim Holtz' The Journey set with Stormy Sea ink and Wendy Vecchi's Vintage Lace stamp with Picket Fence Distress Ink (also used to distress the top of the card. The sentiment is from Tulip Time. The Doily Details die cut is stamped with Altenew's Vintage Roses (stamped in Lovely Lady, Autumn Rose, and Scarlet Jewel inks). There are also two fussy cut roses attached with layers of foam tape over Papertrey Ink's Fresh Snow Velvet Ribbon (I might be addicted to this). Crystal sequins for the finishing touch.
Inside, I stamped the set of three from Tulip Time and attached a Spiral Notebook Page die cut (from Patterned Vellum) stamped with sentiments from Inside & Out: Well Wishes attached with my Tim Holtz Tiny Attacher with the staples colored gold with Ranger's Gold Alcohol Ink.
Saturday, March 19, 2016
A Birthday Card
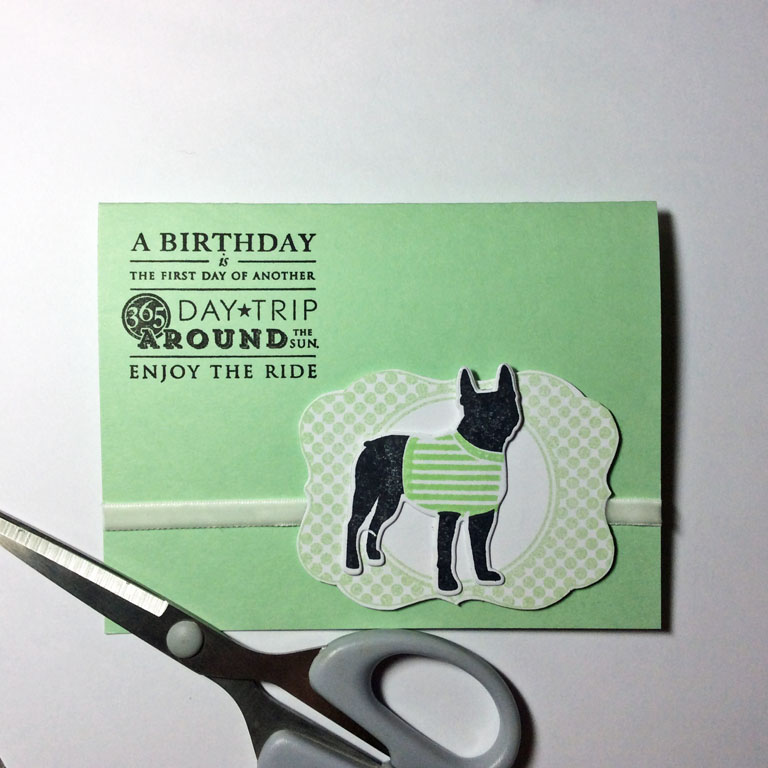
A Birthday Card for someone who loves dogs and Mint Julep green. Velvet Ribbon, Mat Stack 4 polka dot background (stamped with Mint Julep), Come All Ye Faithful (with the dog's coat stamped with Vintage Jadeite) and my favorite sentiment from Stylish Sentiments: Birthday.
The inside is stamped with some banners and sentiments from Hooray. The banners in Mint Julep and the sentiments with Onyx Black VersaFine ink.
Monday, February 29, 2016
So Happy
The letters, banners and patterned paper are from Brenda Walton's Scrap Pad to Go by K&Co. The doily is from Papertrey Ink's Doily Details set and the bunnies are from the Simply Spring Borders set.
Subscribe to:
Posts (Atom)