Showing posts with label Scrapbook Layout. Show all posts

Saturday, September 10, 2022

When I named My Cats Merry, Bright, & Jingle layout


People have certain expectations of my holiday home decor because I named my cats Merry, Bright & Jingle. I used 12 different stamp sets, a couple of dies, Texture Paste, and heat embossing to explain the difference.

The Expectation.


The Reality.


The Humbug makes it Holiday : D.


Altenew

Dot Labels stamp and die set


Kelly Purkey Simon Exclusive

F Bomb


My Favorite Things

Merry & Bright stamp set


Papertrey Ink

Comic Strip cover die

Ink

Jingle All the Way stamp and die set

Lighten Up stamp and die set

O'Tannenbaum stamp set

On My Couch stamp and die set

On My Couch Additions stamp set

On the Wagon stamp and die set

Snowfall Style stencil

Tiny Treats: Christmas stamp set


Tim Holtz 

Alphanumeric die set

1" Alphanumeric die set

Distress Ink

Distress Oxide Ink

Snarky Cat Christmas stamp set

Texture Paste

Watercolor Trees stamp set


Wednesday, May 16, 2018

Harry Potter 7 part 2 layout

 
This is one of the most complicated layouts I've ever made, summing up my enjoyment of Harry Potter's adventures and my feelings about the last of the "new" events. The focal point is the slide cover of  the Harry Potter 7 part 2 blu-ray. It's a motion image showing Harry and his friends on one angle

and Voldemort and his cronies on the other. The frame is made with strips of Tapeworks lime green polka dot tape and American Craft green Glitter Ribbon.

The paper is from the Recollections Floral Fantasy Paper pad. And had this drapey pattern that reminded me of the veil. I started by stamping the clouds from Altenew's Rain or Shine set with Distress Oxides (Hickory Smoke, Iced Spruce, and the last layer stamped twice with Antique Linen and Black Soot slightly off center).and embossing the lighting with Ranger Weathered White Antiquities embossing powder. For the record, I can not adequately express my love of stamping with Distress Oxide inks on dark paper! All the frames are made with Altenew's Framed stamp and die set. All the cardstock used to make the frames is from Papertrey Ink.

 The largest is made with Papertrey Ink's Stormy Sea cardstock and heat embossed with American Craft Zing! Neon Yellow embossing powder. Twisted Citron Distress Oxide was used to pretty much cover the entire image, then painted with Stormy Sea ink and a very liberal use of water using the Distress Sprayer.

The frame was made using Honey Nut cardstock and Lindy's Stamp Gang King Midas Gold embossing powder. The inside of the frame is colored by brushing the Frayed Burlap Distress Oxide inkpad over the cardstock, painting it with a paint made with a drop of Spun Sugar and Scattered Straw Distress Ink reinkers blended with water. Which was then spritzed heavily with the Distress Sprayer.

The books were made by cutting a 1 inch strip of cardstock from Altenew's New Day card kit. Fold a crease about the width of the book spine. Round a bit more than the width of the spine on a edge, then make another crease and cut. Glue flat edges together. The numbers were written with a gold Uni-Ball gel pen. The spines were dipped in a puddle of Frayed Burlap Distress Ink blotted on the craft mat and spritzed with water. Then when they were dry, highlighted with Frayed Burlap Distress Crayon (smudged with finger).

Weathervane cardstock with Turquoise Antiquities embossing powder by Ranger. Painted with a drop of Peeled Paint Distress Ink reinker spritzed with water. Then spritzed with water when it dried and dabbed dry.

Winter Wisteria cardstock. The frame is embossed with American Craft Zing! Cricket embossing powder painted with Weathered Wood Distress Ink. The center is stamped with the book from Papertrey Ink's All Booked Up and Super Fine Detail Gold embossing powder by Ranger. This is also sprinkled above the book. The book is colored with Picket Fence and Candied Apple Distress Markers. Sparkles are drawn with a gold Uni-Ball gel pen.

Because the focal image had a bit of height I cut the frame again out of fun foam covered with Papertrey Ink Adhesive Paper (much easier to attach things to fun foam with this on it). Then cut away the parts where the frame is.

Started with Spring Moss cardstock and Weathered White Antiquities embossing powder by Ranger. The frame was painted with a drop of Peeled Paint Distress Ink reinker and one drop of Weathered Wood Distress Ink reinker spritzed heavily and blended. The Deathly Hallow symbol was drawn by hand.

My favorite embellishment. Stormy Seas cardstock with Wendy Vecchi Sky Blue embossing powder painted with Stormy Seas ink and misted with water. The doe is from Papertrey Ink's Make It Market kit: Tinsel & Tags with Silver embossing powder by Ranger. Picket Fence Distress Marker to give it more of a "patronus" feel.

The banner is a strip of patterned paper from a very old K&Co collection, distressed with a Tim Holtz Tonic Distresser, and written on with a gold Uni-Ball gel pen.

Sunday, May 6, 2018

I Know You Re-Do

New: The journaling now a more natural fit, the middle strip guides the eye to the connection between the two people, coloring the letters and their shadows connect them to the page. I used a combination of Squeezed Lemonade, Dried Marigold, and Tattered Rose Distress Markers.
 
Old: The problems I had were the gaps between the letters and the patterned paper, the writing on the bottom distracting, no natural space for the journaling (which was key to the page).


Wednesday, May 2, 2018

Cantankerous When I Want to be Finale

I've been working on this page a while (2015), but I THINK it's done. The journaling is finished! I love altering photographs, but never the originals. I scan the originals and then print out a new one. I also love twisting the expectation with a contrasting first glance and the actual subject matter.

I added a die cut indicating the journaling is pulled out using a little arrow from Papertrey Ink's Movers & Shakers Sentiments set. I die cut a scrap of glossy paper and stamped the background with Papertrey Ink's Monthly Moments: Tabbed set.

I might add a couple more F Bombs from Kelly Purkey's F Bomb set.

Paper: Anna Griffin, 12x12 vellum, Papertrey Ink Sweet Blush cardstock, Vintage Glassine (for postage stamp collecting).

Stamps: Papertrey Ink Honey Bees, Monthly Moments: Tabbed, Movers & Shakers Sentiments, Simple Alphabets; Kelly Purkey F Bomb

Cricut: Cricut Explore doesn't show which images were used. No idea about the Vellum, letters, speech bubble, and the beetle. The toads are from Spells & Potions.

Miscellaneous: Stickles, Handsput Silk Embroidery Thread (used to stitch translucent pieces in place), Deckle edged scissors (for Journal Pocket), White Opaque Embossing Powder, Glossy Accents


There is something so satisfying about making embellishments : D. This little toad is one of my all time favorites.

Wednesday, April 25, 2018

Papertrey Ink April 2018 Blog Hop

Papertrey Ink's April 2018 Blog Hop inspiration picture. Since I'm doing 100 days of scrapbooking, I made a layout.

I started with a light blue piece of cardstock and drybrushed it with a mixture of white acrylic paint with a drop of Peeled Paint Distress Ink reinker.


Supplies:

stamps: All Booked Up, Art with Heart, Stitch in Time Borders, Stitched Alphabet, Stitching Garden, Type Strips
inks: Picked Raspbery Distress Ink, Worn Lipstick, Forest Moss Distress Oxide, Blueberry Sky, True  Black, Versamark
embossing powder: Stampendous Chunky Gold
Stickles: Gold


Tuesday, March 20, 2018

My Dog Susie

Most of  my childhood was documented in slides. A small handful resurfaced, and thanks to a handy dandy slide scanner they now exist digitally as well : D. This is a picture of my first dog, Susie. She was adorable, and I can't tell now if this was a puppy picture or a grown picture.

Another layout inspired by Altenew Academy's Stamps Meet Scrapbook Scrapbook class. The green and blue papers are from the Reflection kit. The white cardstock is Papertrey Ink's Linen cardstock which has a lovely subtle texture. The flowers are from Altenew's Frosted Garden set.

I used Papertrey Ink's Stitched Coasters die to make a stitchable square to make it easier to find Susie in the picture and stitched a frame in the photo using 2 strands of DMC 4075, one strand of DMC Gold Metallic and one strand of handspun 2ply Merino top. The mat is stamped repeatedly with one of the stamps from Papertrey Ink's Limitless Labels. The nugget wrapper shows what it looks like when it is only stamped once.

Life Imitating Craft

I took the Altenew Academy Class Stamps Meet Scrapbook. It gave me the motivation to scrap this photograph I took after reenacting a stamp from Papertrey Ink's Studio Style with my collection of PTI ribbons (in Ocean Tides). The stamped images on Shrinky Dink shown in the picture are used on the page after being colored in with colored pencils.

The page is stamped with Papertrey Ink's Fine Linen ink using a stamp Altenew's Coffee with a Splash set. The acetate butterfly is from Altenew's Reflection kit.

I love all the different textures of the ribbons (twill, stitched, satin, grosgrain, swiss dot), the gold watercolor, gold embossing powder, gold Thickers, Altenew's Alphabet Stickers, and the matte shrinky dink embellishments.

The "My soul is fed with stamps and ink" sentiment comes from Aletnew's Crafty Life stamp set. "I [heart] paper crafting" and "Do something creative every day" come from PTI's Studio Style.

I stamped the largest frame from Altenew's Framed set on PTI's Linen Cardstock with Versamark Ink and the applied Ranger's Super Fine Detailed Gold Embossing Powder and then brushed it in places for a more distressed look before heating it. Then I painted it with #90 Gold Kuretake Gansai Tambi watercolor before fussy cutting it.

The butterfly and ribbon Shrinky Dink embellsihments were attached by stitching them to the page with a 2ply handspun bombyx silk embroidery thread.

Wednesday, May 11, 2016

I Know You

Outlines Alaphabet from Papertrey Ink with the y tail cut out with a craft knife, stamped along a pencil line (gotta love a good eraser). Stampin' Up Painted Petals flowers stamped on pink patterned paper.The yellow and pink gingham comes from Brenda Walton's Dollhouse scrap pad by K&Compay.

Monday, February 29, 2016

So Happy

The letters, banners and patterned paper are from Brenda Walton's Scrap Pad to Go by K&Co. The doily is from Papertrey Ink's Doily Details set and the bunnies are from the Simply Spring Borders set.

Monday, February 22, 2016

Shopping Time was Fun Time

A re-do of a previous page. I worked full-time and we commuted about a hour each way (depending on traffic and weather), so a big part of our quality time was while we were shopping. I used Papertrey Ink's Label Basics and the matching dies except for the large rectangle to the left which required partial inking of a smaller stamp to stamp the corners and then fill in the edges on the sides. The labels were cut from scraps of patterned paper and stamped with Pure Poppy and Aqua Mist inks.

The title was a negative of the original title cut (Cricut, Street Signs Solutions cartridge) used with a foam blender and Salty Ocean Distress Ink. The shopping carts are from My World cartridge spritzed with a shimmery mist and saved from the original layout.

Wednesday, August 12, 2015

Club Scrap Blog Hop

 
I'm so excited to be a guest artist for the Club Scrap Blog Hop. I was sent a 50s Kitchen Lite kit,  Art Nouveau stamp set, flattened bottle caps and the Cupcake stencil. Seriously so much fun in one pizza box! I made a double layout, four cards, a mini book and an earring holder and there is still so much left for future crafting.

A "Recipe for Happiness" card stamped with the 50s Kitchen Art Nouveau stamp set. The mixing bowls are stamped repeatedly on the bottom half in yellow. The recipe is stamped in blue.

For the layouts I used the two sheets of black cardstock, red and turquoise to mat photographs and one sheet of the white patterned cardstock. The border strips are made from one of the borders from the tan cutapart sheet which was cut in half.

"Chef Mickey's" is cut with Cricut Street Signs Solutions cartridge. The patterned cardstock is 12" x 5".

The arrow is hand cut with a pair of scissors and then doodled on the edge. The journal card is from the white cutapart sheet.The white patterned cardstock on this page is 12" x 6".

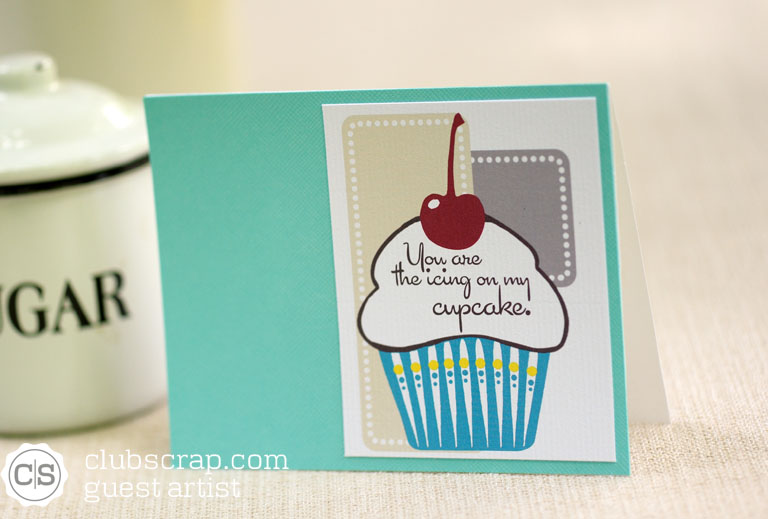
A trio of cupcake cards, made three ways.

The first card is made with turquoise cardstock, the sentiment is from the tan cutapart sheet and the cupcake is from the white cutapart sheet. Inked edges and ribbon tie the two pieces together.

I used one of the white mats and traced the cupcake stencil with a pencil. I drew over the lines with a marker and erased the pencil lines. It's an easy peasy way to get a hand-drawn look. The key is to keep the marker moving without hesitation (YOLO lol). I colored the cherry and cupcake wrapper with Festive Berry and Squeezed Lemonade Distress Markers. The sentiment is from Club Scrap's National Parks kit. The card front is made with the turquoise cardstock and then adhered to an A2 card base.

Another card front made from the turquoise cardstock with the large cupcake from the white cutapart sheet attached to an A2 card base.

The kit has an embellishment storage container that is great for a collection of food earrings. I put Scor-Tape across both sides of the front lip of the container and covered it with a 1" strip of the white patterned cardstock. I used the Tim Holtz Tiny Attacher to attach a piece of the ribbon. The flattened bottle cap is attached with a couple of strips of Scor-Tape on the inside of the cap and a large 3D glue dot.

The final project is a mini book made with the mini book included in the kit. One of the best things about this album is the ring binding. I'm sending this off with a college student with a few pages filled out and a few blank pages. Then as the year goes on, I'll send a few more decorated pages with each card I send which can be easily added to the book.

The covers are made with the tan print cardstock, red and turquoise cardstock, and ribbon. The "good stuff" on the front cover comes from the white cutapart sheet with a line doodled around the edges.

The cupcake is made by tracing the stencil with a fine line black marker. The cherry is colored with a Zig Clean Real Brush Marker which is also used to doodle a frame for the page.

These pages were made by stamping the background and adding cutaparts with doodled frames.

Some of the pages are just handwritten. The cherries are stamped using markers.The sentiment is from the National Parks kit.

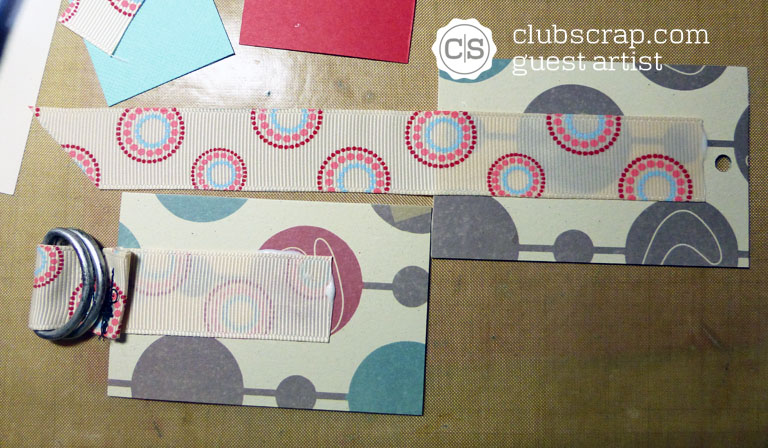
The ribbons are glued to the covers with Club Scrap Bookbinding glue for extra hold. The front cover ribbon is glued down with the tail going off the bottom with the ribbon right side up (shown on the right side of the picture).

A pair of 1" D-rings work with the ribbon for the closure. The only ones I could find were a dark pewter, so I used some Silver Pigment Alcohol Ink to lighten them up. The closure works no matter how many pages are in the book.

The D-rings are enclosed with a sewn loop and only 1 inch of the ribbon (the end without the rings) is glued right side down so the rings are over the top of the cover. Then the mats are glued down over first part of the ribbon that is glued. Then the loose part of the ribbon can be glued over the mats. I added a ring of ribbon above the D-Rings to give it a more finished look.

The next stop on the Blog Hop is the back to Club Scrap!

Friday, July 31, 2015

Model Baby

Another layout from 2011 during my time as a member of the Design Team for Club Ruby Designers. I don't do a lot of traditional Valentine's Day crafts, so I used the Valentine's Day kit for a Model Baby layout. I used the Formal Occasion cartridge for the frames, but I do not remember which font cartridge I used. Since we had two sheets of the paper with the hearts I fussy cut some of them and popped them up with foam dots. I think this was the first time I turned color photographs into black and white for scrapping purposes.

Thursday, July 30, 2015

The Candy Aisle Was Haunted

Another layout from my Club Ruby Designers Design Team Days (2011). The letters are all cut with the Printing Press Cricut cartridge and then doodled with a black marker around the edges. I don't remember how I cut the bowl, but the Chocolate Bunny is from the Easter 2010 cart, the peeps are from the Spring Holiday cart and the Grabby Gotcha hand is from the October 31st cart.

Wednesday, July 29, 2015

Your Presence is the Best Gift!

I found some layouts I'd made when I was on the Club Ruby Designers Design Team in 2011. The website was taken down after it closed and the computers with all the data are in need of repair. This is for a picture of everyone who was at my child's surprise party... I have a feeling the picture might be on one of those computers too, but I'm still looking through all the backup disks.