This is one of the most complicated layouts I've ever made, summing up my enjoyment of Harry Potter's adventures and my feelings about the last of the "new" events. The focal point is the slide cover of the Harry Potter 7 part 2 blu-ray. It's a motion image showing Harry and his friends on one angle
and Voldemort and his cronies on the other. The frame is made with strips of Tapeworks lime green polka dot tape and American Craft green Glitter Ribbon.
The paper is from the Recollections Floral Fantasy Paper pad. And had this drapey pattern that reminded me of the veil. I started by stamping the clouds from Altenew's Rain or Shine set with Distress Oxides (Hickory Smoke, Iced Spruce, and the last layer stamped twice with Antique Linen and Black Soot slightly off center).and embossing the lighting with Ranger Weathered White Antiquities embossing powder. For the record, I can not adequately express my love of stamping with Distress Oxide inks on dark paper! All the frames are made with Altenew's Framed stamp and die set. All the cardstock used to make the frames is from Papertrey Ink.
The largest is made with Papertrey Ink's Stormy Sea cardstock and heat embossed with American Craft Zing! Neon Yellow embossing powder. Twisted Citron Distress Oxide was used to pretty much cover the entire image, then painted with Stormy Sea ink and a very liberal use of water using the Distress Sprayer.
The frame was made using Honey Nut cardstock and Lindy's Stamp Gang King Midas Gold embossing powder. The inside of the frame is colored by brushing the Frayed Burlap Distress Oxide inkpad over the cardstock, painting it with a paint made with a drop of Spun Sugar and Scattered Straw Distress Ink reinkers blended with water. Which was then spritzed heavily with the Distress Sprayer.
The books were made by cutting a 1 inch strip of cardstock from Altenew's New Day card kit. Fold a crease about the width of the book spine. Round a bit more than the width of the spine on a edge, then make another crease and cut. Glue flat edges together. The numbers were written with a gold Uni-Ball gel pen. The spines were dipped in a puddle of Frayed Burlap Distress Ink blotted on the craft mat and spritzed with water. Then when they were dry, highlighted with Frayed Burlap Distress Crayon (smudged with finger).
Weathervane cardstock with Turquoise Antiquities embossing powder by Ranger. Painted with a drop of Peeled Paint Distress Ink reinker spritzed with water. Then spritzed with water when it dried and dabbed dry.
Winter Wisteria cardstock. The frame is embossed with American Craft Zing! Cricket embossing powder painted with Weathered Wood Distress Ink. The center is stamped with the book from Papertrey Ink's All Booked Up and Super Fine Detail Gold embossing powder by Ranger. This is also sprinkled above the book. The book is colored with Picket Fence and Candied Apple Distress Markers. Sparkles are drawn with a gold Uni-Ball gel pen.
Because the focal image had a bit of height I cut the frame again out of fun foam covered with Papertrey Ink Adhesive Paper (much easier to attach things to fun foam with this on it). Then cut away the parts where the frame is.
Started with Spring Moss cardstock and Weathered White Antiquities embossing powder by Ranger. The frame was painted with a drop of Peeled Paint Distress Ink reinker and one drop of Weathered Wood Distress Ink reinker spritzed heavily and blended. The Deathly Hallow symbol was drawn by hand.
My favorite embellishment. Stormy Seas cardstock with Wendy Vecchi Sky Blue embossing powder painted with Stormy Seas ink and misted with water. The doe is from Papertrey Ink's Make It Market kit: Tinsel & Tags with Silver embossing powder by Ranger. Picket Fence Distress Marker to give it more of a "patronus" feel.
The banner is a strip of patterned paper from a very old K&Co collection, distressed with a Tim Holtz Tonic Distresser, and written on with a gold Uni-Ball gel pen.
Showing posts with label Papertrey Ink. Show all posts
Wednesday, May 16, 2018
Sunday, May 6, 2018
I Know You Re-Do
New: The journaling now a more natural fit, the middle strip guides the eye to the connection between the two people, coloring the letters and their shadows connect them to the page. I used a combination of Squeezed Lemonade, Dried Marigold, and Tattered Rose Distress Markers.
Wednesday, May 2, 2018
Cantankerous When I Want to be Finale
I've been working on this page a while
(2015), but I THINK it's done. The journaling is finished! I love
altering photographs, but never the originals. I scan the originals and
then print out a new one. I also love twisting the expectation
with a contrasting first glance and the actual subject matter.
I added a die cut indicating the journaling is pulled out using a little arrow from Papertrey Ink's Movers & Shakers Sentiments set. I die cut a scrap of glossy paper and stamped the background with Papertrey Ink's Monthly Moments: Tabbed set.
I might add a couple more F Bombs from Kelly Purkey's F Bomb set.
Paper: Anna Griffin, 12x12 vellum, Papertrey Ink Sweet Blush cardstock, Vintage Glassine (for postage stamp collecting).
Stamps: Papertrey Ink Honey Bees, Monthly Moments: Tabbed, Movers & Shakers Sentiments, Simple Alphabets; Kelly Purkey F Bomb
Cricut: Cricut Explore doesn't show which images were used. No idea about the Vellum, letters, speech bubble, and the beetle. The toads are from Spells & Potions.
Miscellaneous: Stickles, Handsput Silk Embroidery Thread (used to stitch translucent pieces in place), Deckle edged scissors (for Journal Pocket), White Opaque Embossing Powder, Glossy Accents
There is something so satisfying about making embellishments : D. This little toad is one of my all time favorites.
Wednesday, April 25, 2018
Papertrey Ink April 2018 Blog Hop
Papertrey Ink's April 2018 Blog Hop inspiration picture. Since I'm doing 100 days of scrapbooking, I made a layout.
I started with a light blue piece of cardstock and drybrushed it with a mixture of white acrylic paint with a drop of Peeled Paint Distress Ink reinker.
Supplies:
stamps: All Booked Up, Art with Heart, Stitch in Time Borders, Stitched Alphabet, Stitching Garden, Type Strips
inks: Picked Raspbery Distress Ink, Worn Lipstick, Forest Moss Distress Oxide, Blueberry Sky, True Black, Versamark
embossing powder: Stampendous Chunky Gold
Stickles: Gold
School Picture Dilemma
We have a relatively small family and there were usually lots of leftover photographs especially the wallet size photographs. The quandary is always what to do with the leftover photographs. Three down! : D.
Another dilemma was the alphabet sticker. I really wanted to use this retired (?) Pink Paislee Old School Glitter set, only I was missing a lower case m and an o. So I used an upper case m, and the inner circle from two o's (with extra sticking power from Tim Holtz' Collage Medium).
Originally I had used this stamped die cut from Papertrey Ink's Be Mine, Valentine. But I felt it was out of scale.
So I restamped it on some Shrinky Dink and shrunk it down : D.
It also serves as the slide indicator for the pull out journaling. (I LOVE pocket journaling).
One of the most ingrained lessons of my childhood is that photographs must be handled carefully, held at the edges. So I challenge myself to alter photographs. If I have many, I'll alter an original, otherwise I alter copies. In this case I used a poker to scratch a halo and "smile" and then added a rub-on from a Three Birds kit purchased in 2010ish.
Supplies:
My Mind's Eye Fine & Dandy papers
Pink Paislee Old School Glitter Sticker Alphabet
Tim Holtz Tape Postal (grid and ruler tape)
Tape Works - polka dot
Rub Ons from a very old kit by Three Birds
Shrinky Dink
Papertrey Ink stamp and die: Be Mine, Valentine
Wendy Vecchi Inks: Orange Blossom, Coffee, and Rose Mader
Friday, March 30, 2018
Transformation Tuesday
Papertrey Ink has started a new challenge called Transformation Tuesday. I put a strip of 1/4 Scor Tape across the card and applied Pure Poppy Grosgrain Ribbon to it. The mat is die cut with Mat Stack 3, and stamped with the matching image from All Booked Up with Fresh Snow ink. The teapot is from Tea for Two, and the cup is from Tea for Two Additions stamped with Candied Apple Distress Oxide ink. I colored a piece of scrap paper with the same ink and used a vintage heart shaped hole punch for the hearts.
The background is mini embossed enamel dots using Stampendous Shabby Blue embossing powder.
My original card is from a challenge for Papertrey Ink's 5th Anniversary.
Wednesday, March 28, 2018
Snowfolk, Birthday Flower Wearing Style
A shaped birthday card for someone who loves snow folk. And because I'm so ready for spring. I cut two snow folk with Papertrey Ink's Shape Up: Snowman die.
The face is stamped with the matching stamp set. The wreath is die cut from the Make It Market kit: Garden Gate, The tulips are cut from the MIM kit: Market Street. The cake is made with the Tremendous Treats: Birthday set. The cake is colored with Vintage Photo and Scattered Straw Distress Markers and the candles and plate are colored with Cracked Pistachio. The candles have a tiny dot of Xmas Stickles and Mustard Seed flame and glow. The arms are colored with Gathered Twigs spritzed with water.
I added a bit of dimension by shaping the flowers of the wreath before gluing them (Tombow Multi Glue). The cake has 2 layers of foam tape. The hands are glued to the cake and the arms to the body.
The second die cut is just large enough for this sentiment from Offbeat Birthday.
And I included a Wallet Size Magnifier : D.
I have the most success die cutting stamped images with a closed die by saving the remainder of a diecut and lining up the stamped image on a cutting plate, and then fitting the die into the template. I am a HUGE fan of Tim Holtz' Sizzix Sidekick for cutting all the little things right at my desk.
Sunday, March 25, 2018
Papertrey Ink March 2018 Blog Hop
My take on the Papertrey Ink March 2018 Blog Hop. I started by cutting out the middle of one of the papers from the Nostalgic Notions Make It Market kits. Everything else comes from Forest Floor: Spring. The mat the sentiment is stamped on was stamped in Spring Rain first, then blended with an Aqua Brush. Then stamped again with Blueberry Sky. I only glued the sides and bottom to make the mat a pocket.The sentiment was stamped with Gathered Twigs Distress Oxide.
The ferns were stamped with Bundled Sage Distress Oxide, the Snowdrop and Lily of the Valley stems were stamped with Forest Moss Distress Oxide. The Snowdrop flowers were stamped in Spun Sugar Distress Ink and the Lily of the Valley flowers were stamped with Tattered Rose Distress Oxide.
Tuesday, March 20, 2018
My Dog Susie
Most of my childhood was documented in slides. A small handful resurfaced, and thanks to a handy dandy slide scanner they now exist digitally as well : D. This is a picture of my first dog, Susie. She was adorable, and I can't tell now if this was a puppy picture or a grown picture.
Another layout inspired by Altenew Academy's Stamps Meet Scrapbook Scrapbook class. The green and blue papers are from the Reflection kit. The white cardstock is Papertrey Ink's Linen cardstock which has a lovely subtle texture. The flowers are from Altenew's Frosted Garden set.
I used Papertrey Ink's Stitched Coasters die to make a stitchable square to make it easier to find Susie in the picture and stitched a frame in the photo using 2 strands of DMC 4075, one strand of DMC Gold Metallic and one strand of handspun 2ply Merino top. The mat is stamped repeatedly with one of the stamps from Papertrey Ink's Limitless Labels. The nugget wrapper shows what it looks like when it is only stamped once.
Wednesday, December 20, 2017
WOYWW 446
Using my Tim Holtz Stamping Platform. The unexpected favorite thing about this is being able to pull off the lid to stamp it, and put it back on easy peasy one handed if need be. The gold paint has been put to good use for many things including painting the edges of the die cut used in the card below. Lots and lots going on, stamps pile high on the left, a Christmas Tree die getting buried, glues and more stamps.
One of the die cuts from Papertrey Ink's Mix & Mat: Berry Boughs dies, painted gold around the edges, painted with Tumbled Glass Distress Ink in the middle. The deer from Dash away all, and die cut printed trees from the Wonderland kit.
Head over to Julia's Stamping Ground for more crafty ganders : D.
Labels:
Papertrey Ink,
Stamping Platform,
Tim Holtz,
WOYWW
Thursday, September 21, 2017
Embedded Object Page
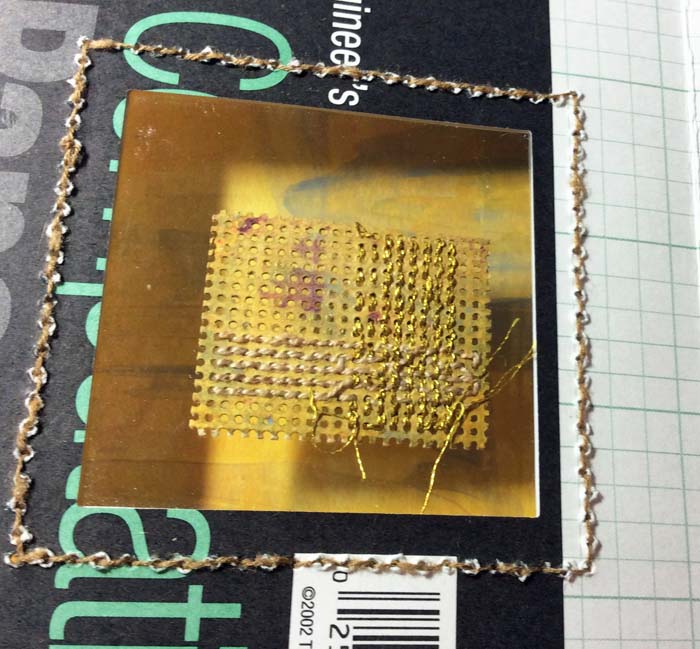
Day 7 from the creativebug book art class. The two sides are also stitched together with pierced holes and handspun chain-plied cinnamon tussah silk embroidery thread. Ends left for an interactive elements since the dur-a-lar prevents the perforated paper from being touched.
There are a few drops of gold paint for a little extra shine : D.
I started with a little piece of perforated paper that has been on my desk for a couple of years. I started painting it with paint I had left on my desk when I was coloring background papers. This was the front.
Until I turned it over. Now this is the front.
I stitched the perforated paper some Pearl Cotton and DMC Gold Metallic floss. I liked both sides so I decided to make two pages that worked together so both sides could be seen. The windows were cut with the square from Papertrey Ink's Limitless Layers: 2 1/4 Square die.
The back can be seen on the next page. I used the square cut from the paper to fill in the hole on this page. The piece is seen against the same background no matter which side is looked at.
I love being able to see the shadows cast too.
Wednesday, August 30, 2017
Stamp-a-Faire 2017: Wool with Debbie Olson
The challenge is to make wool cookies. I used some scraps of Papertrey Ink Fine Linen as the Sugar Cookie base. I stitched sprinkles and faces and then attached jump rings to the back.
The pattern was made by cutting out a cookie from the Friendship Jar: Holiday cookie stamp.
Then cutting out the icing.
The pattern was made by cutting out a cookie from the Friendship Jar: Holiday cookie stamp.
Then cutting out the icing.
Labels:
Felt,
Friendship Jar: Holiday set,
Gift,
hand stitched,
Jewelry,
Papertrey Ink,
SAF 2017
Thursday, August 24, 2017
Papertrey Ink Vellum Birthday Card
I love making clear and translucent cards. Papertrey Ink's Vellum is easily sturdy enough to make a card with. In this case I used the large Jellyfish and go with the flow sentiment from Altenew's Painted Jellyfish stamp set. The happy birthday sentiment is from Club Scrap's Gimme A Ring kit. The largest jelly fish layer is stamped with Papertrey Ink's Fresh Snow. I heat set it and waited a while to move on to the next layers which included Sap Green Archival Ink and Wendy Vecchi's Cornflower Blue.
The mat effect is from a piece of folded patterned paper (enhanced with Faded Jeans Distress Oxide).
The folded patterned paper lifts up to reveal the birthday sentiment : D.
The mat effect is from a piece of folded patterned paper (enhanced with Faded Jeans Distress Oxide).
The folded patterned paper lifts up to reveal the birthday sentiment : D.
Subscribe to:
Posts (Atom)