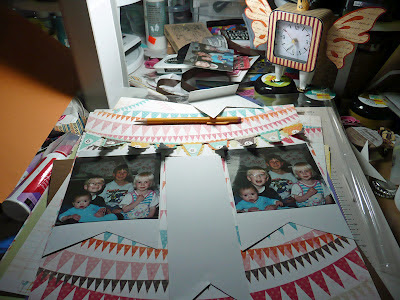
Sometimes a layout will get put aside for a variety of reasons, but sometimes that works out to my advantage and I go in a different direction that I like even better. as in this case. I dropped the idea of banner mats, used more pattern papers and some Papertrey Ink vellum (distressed with a scissor on the right side). And fussy cut some arrows from Papertrey Ink's Get to the Point set. Glossy Accents dots over the letter stickers.
Until recently this was as far as I had gotten since I placed all the pieces together on August 25, 2012 to mull it over while I worked on something else.
Showing posts with label Glossy Accents. Show all posts
Monday, July 27, 2015
Sunday, June 14, 2015
Coffee and Doughnut
The Doughnut frosting is painted with Papertrey Ink's Dark Chocolate and a waterbrush. The coffee cozy is painted with Pure Poppy. The doughnut frosting and coffee cup eyes are covered with Glossy Accents.
Thursday, April 9, 2015
Cantankerous When I Want to Be Layout, part two.
I thought I had finished this layout before, but apparently not lol. Quick synopsis before the additional embellishments. A scanned picture of myself as a baby. I can not remember a time that I didn't hate tight clothing. The base is Anna Griffin paper with a die cut vellum overlay hand stitched with handspun embroidery thread. Cantankerous and #$@& is glassine paper from my father's stamp collecting supply die cut with Cricut Explore. The glasssine letters and vellum mat are wrinkled with the pink Stickles used to adhere the glassine letters.
I added the speech bubble, toads, bug rosette and journal pocket (under the larger toad). I used Tombow Multi-Glue on the back of the new embellishments (waiting till it had dried but remained sticky) to give just a little dimension.
The pocket is Papertrey Ink Sweet Blush. The edges are cut with a pair of decorative edge scissors to pick up the deckled edge of the original photograph. The pocket is stamped with white pigment ink with Papertrey Ink's Honey Bees stamp set. The toad is from Cricut (the Explore software doesn't have a way to show where an image came from after it's been put in a project). The top layer is heat embossed with white opaque embossing powder and the eye is Glossy Accents.
The top layer of the smaller toad is also heat embossed with opaque white embossing powder. I've always loved watching toads. My hands have memorized them : ).
The speech bubble is another Cricut diecut. The Arrrrgyles is stamped with Papertrey Ink's Simple Alphabet and Soft Stone ink. I've lost the "L" so I colored an "E" with the L part of the stamp. The discoloration of the photo is in the original, so I let it be. Arrrgyles is the punch line to one of my favorite riddles (what sort of socks do pirates wear?). The edges are distressed with the edge of a scissor.
The rosette is also cut from glassine from my father's stash. It works completely differently than paper or cardstock lol. The beetle is another Cricut cut. The head and abdomen are popped up a little with Tombow Multi-Glue and then the legs and antennae are glued flat. The top layer is covered with Glossy Accents.
Simon Says A is for... I say Amphibians and Arrrgyles : )
I added the speech bubble, toads, bug rosette and journal pocket (under the larger toad). I used Tombow Multi-Glue on the back of the new embellishments (waiting till it had dried but remained sticky) to give just a little dimension.
The pocket is Papertrey Ink Sweet Blush. The edges are cut with a pair of decorative edge scissors to pick up the deckled edge of the original photograph. The pocket is stamped with white pigment ink with Papertrey Ink's Honey Bees stamp set. The toad is from Cricut (the Explore software doesn't have a way to show where an image came from after it's been put in a project). The top layer is heat embossed with white opaque embossing powder and the eye is Glossy Accents.
The top layer of the smaller toad is also heat embossed with opaque white embossing powder. I've always loved watching toads. My hands have memorized them : ).
The speech bubble is another Cricut diecut. The Arrrrgyles is stamped with Papertrey Ink's Simple Alphabet and Soft Stone ink. I've lost the "L" so I colored an "E" with the L part of the stamp. The discoloration of the photo is in the original, so I let it be. Arrrgyles is the punch line to one of my favorite riddles (what sort of socks do pirates wear?). The edges are distressed with the edge of a scissor.
The rosette is also cut from glassine from my father's stash. It works completely differently than paper or cardstock lol. The beetle is another Cricut cut. The head and abdomen are popped up a little with Tombow Multi-Glue and then the legs and antennae are glued flat. The top layer is covered with Glossy Accents.
Simon Says A is for... I say Amphibians and Arrrgyles : )
Sunday, March 15, 2015
Sheep Spinner Dome
It's a sheep spinner dome.I had a vision of putting little sheep in a dome with Papertrey Ink's Make It Market kit: Tinsel & Tags Trimmings house. And originally they were going to be fixed in place, but I wanted it to move.
I briefly considered making it moved by magnet, but since it'll be auctioned off I decided to make it a spinner. (Magnets can be very dangerous for small children and can be lost which would make it a fumbling sheep). You can see another Dome Scene with moveable deer (with a magnet) here, there's even a little video of it in action.
The house is cut from Vintage Cream. The house is stamped with Fine Linen, and painted with Fine Linen smooshed on the craft mat and spritzed with water. The same is done for the roof except with Classic Kraft ink. After it was assembled I put Glossy Accents on the roof.
After getting some great advice from the PTI forum about stamping backwards, I was able to stamp a sheep in each direction. I used Versafine ink, stamped the image on a solid stamp and then stamped that onto cardstock. (the reverse stamp is the one on the right). I went over it with an ultra fine line Sharpie.
I folded a small strip of plastic packaging (cut from the bit that folds in in a Papertrey Ink box) and glued a sheep on each side. Then I bent open the two ends like a brad. The space under the sheep was colored with a green marker. After this picture was taken I colored in all the white edges with a Black Soot Distress Marker.
Here it is attached to the button with score tape. The plastic was trimmed along the edges of the button. Because of the width of the plastic I used, the sheep travels in a straight line.
Originally I used 2 layers of foam tape, however the plastic stand for the sheep added more height than I anticipated, so a third layer had to be added. Note to self: test height after the sheep is attached.
The testing phase.
The foam tape needed to be covered. The Martha Stewart Icicle Punch can make great grass by moving it every 1/4" - 1/3" instead of following the repeat pattern marks. I put a 1/4 length of score tape right under the grass and then cut off any paper under that, peeled off the tape backing and wrapped it around the outer circle. (The doodles are "Time Flies" from a previous project).
Here's the other side of the sheep and all the Stickles flowers.
Simon Says "B is for" and I'm saying Building : ).
I briefly considered making it moved by magnet, but since it'll be auctioned off I decided to make it a spinner. (Magnets can be very dangerous for small children and can be lost which would make it a fumbling sheep). You can see another Dome Scene with moveable deer (with a magnet) here, there's even a little video of it in action.
The house is cut from Vintage Cream. The house is stamped with Fine Linen, and painted with Fine Linen smooshed on the craft mat and spritzed with water. The same is done for the roof except with Classic Kraft ink. After it was assembled I put Glossy Accents on the roof.
After getting some great advice from the PTI forum about stamping backwards, I was able to stamp a sheep in each direction. I used Versafine ink, stamped the image on a solid stamp and then stamped that onto cardstock. (the reverse stamp is the one on the right). I went over it with an ultra fine line Sharpie.
I folded a small strip of plastic packaging (cut from the bit that folds in in a Papertrey Ink box) and glued a sheep on each side. Then I bent open the two ends like a brad. The space under the sheep was colored with a green marker. After this picture was taken I colored in all the white edges with a Black Soot Distress Marker.
The foam tape needed to be covered. The Martha Stewart Icicle Punch can make great grass by moving it every 1/4" - 1/3" instead of following the repeat pattern marks. I put a 1/4 length of score tape right under the grass and then cut off any paper under that, peeled off the tape backing and wrapped it around the outer circle. (The doodles are "Time Flies" from a previous project).
Here's the other side of the sheep and all the Stickles flowers.
Simon Says "B is for" and I'm saying Building : ).
Saturday, February 21, 2015
$12 Meal Scrapbooked and the Joy of It : )
Very belatedly, I did a layout challenge using this sketch. I had so much fun making this layout.
The why of it is a $12 meal at the airport. (The reasons for it, what it was, comparisons, etc.).
The how of it.
The base paper is from a scrapbooking kit called "Destination" by Colorbox I think I bought it over 10 years ago. And there is only ONE sheet of it. And I used it all up lol. And I'm only moderately twitchy over it because it is great "Airport" paper. And I have a lot of Airport scrapping to do which is odd, because I hardly ever fly.
The Title was cut using the Seasonal Postage font with my Cricut Explore (I think it might be a font exclusive to the explore, but I'm not certain). After I cut the letters I covered them with Antique Linen Distress Paint. Then I used Wild Honey and Festive Berries Distress Stains. And finally I used Glossy Accents before I adhered them, and then I filled the cut out portion with more Glossy Accents.
The "mat" is Papertrey Ink Kraft cardstock that was stamped with a foam silverware set I've had for ever stamped with Picket Fence Distress Paint. Then gone over with Wild Honey and Festive Berries Distress Stain then rubbed vigorously with an unscented baby wipe which gave a swede texture to the mat. I attached it at the top and bottom to make a pocket for more journaling.
The side of the journal tag (made with Papertrey Ink Vintage Cream cardstock) with the Clip Tips die cut (Dark Chocolate cardstock) covered with more Glossy Accents as a substitute for one of the embellishments. The compass rose from Road Trip (stamped with Dark Chocolate ink) and the Cosmo Cricket Tiny Type alphabet stickers are the other substitutes.
I try to remember to always make a journal pocket. In this case a jumbo sized one. If I had a nickel for every time I thought I had remembered everything I wanted to say about a page only to remember something else after the last element was glued... I have a lot of nickels lol. (In a pinch I have actually added more of the story to the back of the page).
I moved the lines below the mat on the vellum banners. The plane and arrow stamps are from Clip Tips also.
The why of it is a $12 meal at the airport. (The reasons for it, what it was, comparisons, etc.).
The how of it.
The base paper is from a scrapbooking kit called "Destination" by Colorbox I think I bought it over 10 years ago. And there is only ONE sheet of it. And I used it all up lol. And I'm only moderately twitchy over it because it is great "Airport" paper. And I have a lot of Airport scrapping to do which is odd, because I hardly ever fly.
The Title was cut using the Seasonal Postage font with my Cricut Explore (I think it might be a font exclusive to the explore, but I'm not certain). After I cut the letters I covered them with Antique Linen Distress Paint. Then I used Wild Honey and Festive Berries Distress Stains. And finally I used Glossy Accents before I adhered them, and then I filled the cut out portion with more Glossy Accents.
The "mat" is Papertrey Ink Kraft cardstock that was stamped with a foam silverware set I've had for ever stamped with Picket Fence Distress Paint. Then gone over with Wild Honey and Festive Berries Distress Stain then rubbed vigorously with an unscented baby wipe which gave a swede texture to the mat. I attached it at the top and bottom to make a pocket for more journaling.
The side of the journal tag (made with Papertrey Ink Vintage Cream cardstock) with the Clip Tips die cut (Dark Chocolate cardstock) covered with more Glossy Accents as a substitute for one of the embellishments. The compass rose from Road Trip (stamped with Dark Chocolate ink) and the Cosmo Cricket Tiny Type alphabet stickers are the other substitutes.
I try to remember to always make a journal pocket. In this case a jumbo sized one. If I had a nickel for every time I thought I had remembered everything I wanted to say about a page only to remember something else after the last element was glued... I have a lot of nickels lol. (In a pinch I have actually added more of the story to the back of the page).
I moved the lines below the mat on the vellum banners. The plane and arrow stamps are from Clip Tips also.
Friday, September 12, 2014
The Sky's the Limit
Avery Elle I [heart] u is having a clean and simple challenge. And I have one small AE stamp set (party animal). So I used it : ). It's stamped on a scrap of patterned paper and covered in Glossy Accents. A piece of handspun silk embroidery thread (2-ply) is tied on it but otherwise not attached.
Monday, September 1, 2014
Party Animal
Hand-carved monster stamped on DCWV Indian Summer patterned paper and heat embossed with Zing Opaque White Embossing Powder. The hat is hand cut with a border of Milled Lavender Distress Stickles. The balloon animal and the sentiment are from Avery Elle's Party Animal. The balloon animal is covered with glossy accents. The card base is Papertrey Ink Vintage Cream.Simon Says Anything Goes : D.
Labels:
Avery Elle,
Balloon,
Birthday,
card,
DIY Stamp,
Glossy Accents,
Heat Embossing,
Monster,
Papertrey Ink,
Simon Says,
Stickles,
Technique
Monday, February 27, 2012
My Mojo Monthly - February 2012 - Heartstrings
February's theme on My Mojo Monthly is heartstrings. I am not a romantic, and until I was pregnant with my daughter, I really didn't care for heart shapes at all unless they were broken or anatomical. I still covet an anatomical heart stamp or two, but I am much more tolerant of hearts than I was before :D. While I was pregnant, I also became addicted to House Mouse and my feet grew a size and a half and I'll no-longer crawl over broken glass for Chinese take-out (I still like it a lot though). The baby books left me woefully unprepared for these side-effects of pregnancy lol.
While my page does have a heart on it, it was totally inspired by a picture of a dog named Boo who was not rescued despite some Herculean efforts by volunteers to find her a home. (BTW if you are looking for a pet, please consider rescues.)
I don't know if it's the worried look on her face or the fact she reminds me of my own rescue pup when she is doing her Stellaluna impression, but when I found out she had been killed, it just broke my heart. So I did what scrappy people do, I made a tribute page for her. I felt awareness is something. Working with all the gorgeous Graphic 45 paper made me want to audition for the Graphic 45 Design Team. My tribute to Boo was my first entry.
The winged heart is made with the Cricut Imagine and Love Struck 2010 cartridge covered with Glossy Accents). I spent a lot of time with my craft knife and steel-edged Tim Holtz ruler.
I started by cutting off the frame from Graphic 45 Fashionista "Fashionista". Then I cut off the outter row from Fashionista "Bon Marche". Then I made a large mat from the "Bon Marche" leftovers and made an "X" with a craft knife and painted the folded over bits with gold paint. Added another layer and painted those with a second shade of gold. The final mat is Graphic 45 Botanicabella "Summer Sonata". The background cardstock is an ochre color heavily inked with Wild Honey Distress Ink to add dimension. Finally Boo's picture is attached to heavy cardstock and attached to the mat with two layers of foam tape.
While my page does have a heart on it, it was totally inspired by a picture of a dog named Boo who was not rescued despite some Herculean efforts by volunteers to find her a home. (BTW if you are looking for a pet, please consider rescues.)
I don't know if it's the worried look on her face or the fact she reminds me of my own rescue pup when she is doing her Stellaluna impression, but when I found out she had been killed, it just broke my heart. So I did what scrappy people do, I made a tribute page for her. I felt awareness is something. Working with all the gorgeous Graphic 45 paper made me want to audition for the Graphic 45 Design Team. My tribute to Boo was my first entry.
The winged heart is made with the Cricut Imagine and Love Struck 2010 cartridge covered with Glossy Accents). I spent a lot of time with my craft knife and steel-edged Tim Holtz ruler.
I started by cutting off the frame from Graphic 45 Fashionista "Fashionista". Then I cut off the outter row from Fashionista "Bon Marche". Then I made a large mat from the "Bon Marche" leftovers and made an "X" with a craft knife and painted the folded over bits with gold paint. Added another layer and painted those with a second shade of gold. The final mat is Graphic 45 Botanicabella "Summer Sonata". The background cardstock is an ochre color heavily inked with Wild Honey Distress Ink to add dimension. Finally Boo's picture is attached to heavy cardstock and attached to the mat with two layers of foam tape.
Labels:
Boo,
Cricut,
Distress Ink,
dog,
Glossy Accents,
Graphic 45,
Love Struck 2010 cart,
Paint,
Scrapbook Layout,
Technique,
Tim Holtz,
Tribute
Sunday, February 26, 2012
Graphic 45 Design Team 2012 Audition
Tribute to Boo Layout
No Place Like Home Card
And Your Little Dog Too Pin
Head in the Clouds Gift Boxes:
The body is a small Styrofoam cone with about 2 inches cut off the top. The dress is made with the Party Hat cut from Cricut's Sesame Street's Elmo's Party. The top is cut off and cut into a fringe to fold over the top of the cone. The legs are small pieces of doweling covered with Playtimes Past "Life's A Ball!". The shoes are made with pieces of foam core covered with tissue paper and gesso, painted black. The small box is from Club Scrap. The lid is inked with Peeled Paint Distress Ink and covered with Fashionista "Perfumeries". The head in the clouds box is 3" x 3" x 3" made by scoring a 9" x 9" piece of heavy cardstock at 3" and 6" covered with 5 3" x 3" blue cardstock and clouds distressed with Tea Dye Distress ink.
No Place Like Home Card:
Papertrey Ink Kraft cardstock cut into an A2 sized card. The house is hand cut from Tropical Travelogue "Hibiscus Heaven" inked with Tea Dye Distress Ink. The stamps are all from Hampton Art Graphic 45 Magic of Oz 2 cling. Except for the shoes, everything is stamped with Black Soot Distress Ink. The shoes are stamped with Barn Door Distress Ink and covered with Prisma Glitter.
And Your Little Dog Too Pin:
Stamp Toto from Hampton Art Graphic 45 Magic of Oz 2 cling with Stazon Jet Black ink on the back of a Darice Altered Art Jewelry 1" Crystal Drop. Paint the dog with acrylic paint (Plaid Folk Art Porcelain Blue). Let dry. Punch a 1" circle from Playtimes Past "Toy Soldier Parade". Apply a dollop of Gold Stickles and smear across back of Crystal Drop attached the punched paper and rub across the entire surface. Build a pin base of cardstock and cover with Ribbon Trends Light Blue Gingham 3/8" ribbon. Tie a bow over that. Attach pin back.
Birthday Fishes Card:
Stamp fish from Inkadinkado's Patterned Pets on tracing paper. Cut out three fish. Make a pattern for the fish body and trace onto Tropical Travelogue "Garden Isle", paint the edges with a wash made from Spiced Marmalade Distress Ink and a spritz of water. Attach to cutouts. Dot the eyes with Gelly Roll Glaze. Attach to mat made from Tropical Travelogue "Oceania" with foam dots. Hand cut party hats for the background fish out of scraps (I used Playtimes Past: "Toy Soldier Parade"). Add another mat of black cardstock and attach to an A2 card made with Papertrey Ink's Fine Linen cardstock.
All About Me Layout:
This was one of my projects for Club Ruby Designers' Design Team audition last year, but still one of my favorite projects. It was the first time I was able to finally cut a piece of Graphic 45 paper (Hallowe'en in Wonderland). Everything in the layout comes from the Club Ruby Designers Halloween Wonderland Kit from October 2010.
Time Flies Home Decor
Head in the Clouds Gift Boxes (the Sky and the Ground are both functional boxes).
No Place Like Home Card
And Your Little Dog Too Pin
Birthday Fishes Card
All About Me Layout (an older project, but still a favorite).
Tribute to Boo Layout:
Cut off frame from Fashionista "Fashionista". Cut off first set of triangles from Fashionista "Bon Marche" and glue to the back of the "Fashionista" frame. Gold colored cardstock sheet distressed with Wild Honey Distress Ink. Made a large mat with the left over "Bon Marche" paper leaving the points on one side. Cut a large X with a craft knife and gently peel back, paint the underside with gold paint (Aleene's Premium Coat Gold Paint). Cut a second mat to fit behind the first with an X cut across the middle (paint the underside with a different gold paint (Accent Crown Jewels Imperial Antique Gold). Botanicabella "Summer Sonata" final mat layer. Photograph of Boo attached to heavy cardstock and the edges painted with gold. Mounted on two layers of foam tape. Edge layout with gold paint. Embellishment made with Cricut Imagine and winged heart from Love Struck 2010 topped with Glossy Accents.
Time Flies Home Decor:
Clock sides covered with Communique "On the Dot". Front covered with Playtimes Past "Life's A Ball!" Wings are made with the Cricut Indie Art cartridge with the base cardstock thoroughly inked with Wild Honey, Barn Door and Spiced Marmalade Distress Inks. The wing layers are Botanicabella "Garden Suite". The legs are made with small party hats from Sesame Streets Elmo's Party wrapped tightly, covered with tissue paper and gesso, the points folded to make feet and painted. The crown is made with Tropical Travelogue "Garden Isle" glued into a tube, cut into spikes which are rolled down with a Darice Rhinestone sticker. The secret ingredient is Beacon's 3 in 1 Advanced Craft Glue. One foot is standing on a small flower made from the Close to My Heart Art Philosophy Cricut cartridge cut from Playtimes Past "Toy Soldier Parade".
The body is a small Styrofoam cone with about 2 inches cut off the top. The dress is made with the Party Hat cut from Cricut's Sesame Street's Elmo's Party. The top is cut off and cut into a fringe to fold over the top of the cone. The legs are small pieces of doweling covered with Playtimes Past "Life's A Ball!". The shoes are made with pieces of foam core covered with tissue paper and gesso, painted black. The small box is from Club Scrap. The lid is inked with Peeled Paint Distress Ink and covered with Fashionista "Perfumeries". The head in the clouds box is 3" x 3" x 3" made by scoring a 9" x 9" piece of heavy cardstock at 3" and 6" covered with 5 3" x 3" blue cardstock and clouds distressed with Tea Dye Distress ink.
No Place Like Home Card:
Papertrey Ink Kraft cardstock cut into an A2 sized card. The house is hand cut from Tropical Travelogue "Hibiscus Heaven" inked with Tea Dye Distress Ink. The stamps are all from Hampton Art Graphic 45 Magic of Oz 2 cling. Except for the shoes, everything is stamped with Black Soot Distress Ink. The shoes are stamped with Barn Door Distress Ink and covered with Prisma Glitter.
And Your Little Dog Too Pin:
Stamp Toto from Hampton Art Graphic 45 Magic of Oz 2 cling with Stazon Jet Black ink on the back of a Darice Altered Art Jewelry 1" Crystal Drop. Paint the dog with acrylic paint (Plaid Folk Art Porcelain Blue). Let dry. Punch a 1" circle from Playtimes Past "Toy Soldier Parade". Apply a dollop of Gold Stickles and smear across back of Crystal Drop attached the punched paper and rub across the entire surface. Build a pin base of cardstock and cover with Ribbon Trends Light Blue Gingham 3/8" ribbon. Tie a bow over that. Attach pin back.
Birthday Fishes Card:
Stamp fish from Inkadinkado's Patterned Pets on tracing paper. Cut out three fish. Make a pattern for the fish body and trace onto Tropical Travelogue "Garden Isle", paint the edges with a wash made from Spiced Marmalade Distress Ink and a spritz of water. Attach to cutouts. Dot the eyes with Gelly Roll Glaze. Attach to mat made from Tropical Travelogue "Oceania" with foam dots. Hand cut party hats for the background fish out of scraps (I used Playtimes Past: "Toy Soldier Parade"). Add another mat of black cardstock and attach to an A2 card made with Papertrey Ink's Fine Linen cardstock.
All About Me Layout:
This was one of my projects for Club Ruby Designers' Design Team audition last year, but still one of my favorite projects. It was the first time I was able to finally cut a piece of Graphic 45 paper (Hallowe'en in Wonderland). Everything in the layout comes from the Club Ruby Designers Halloween Wonderland Kit from October 2010.
Tuesday, April 26, 2011
All About Me well I only had one sheet of paper, so it's a lot about me!
This was one of my Design Team Submissions at Club Ruby Designers (did I mention there is a free membership option?) . Everything except the Glossy Accents was included in the Club Ruby Designers' October kit. I started with the Halloween in Wonderland paper and the Viva Decor Hematite Glitter Liner. I put a dot of Glitter liner over every black square around the border, while I tried to decided what to do lol. Then I cut out the top of the keyhole and put a black and white picture of myself flipped backwards in a tribute to the looking glass. I'm taa-daaaing the "Welcome to CHA Super Show" sign last year, because let's face it, it's a wonderland for crafters. I used a cut out from the Botanicals Lite cartridge and skewed an circle into the appropriately sized oval for the title.
I used hearts for different categories of interests with spinners (from Tim Holtz) because I'm really interested in a lot of things and spinners could make choosing what to do a lot easier lol. I couldnt' get the title to "pop" enough for my taste so I used glossy accents to accentuate the cut out. The hearts were all cut from the Cake Basics cartridge and thanks to my Gypsy, I hid the inner contour to make the shadow with the diamond flocked paper and hid the outer cut to make the rusty hearts. I DID forget to add my favorite color though (it's RED) lol. I hand cut little banners and folded them as titles for the different interests. Then I needed more room so I hand cut pieces of paper to fit in the border. I distressed the title layers and the rusty hearts with an open pair of scissors sort of like using a vegetable peeler.
Saturday, January 29, 2011
Beachy Ornament Souvenir Second Set
I made a second set from a different trip. It needed a different box so I could easily sort out which souvenir was which because not everyone went on both trips.
I can't stress how much I love Inkessentials Glossy Accents for sealing the little holes in the ornament topper. Trust me, you need to seal them or you'll be saying as I did, why is there sand all over the table? I just put a little over each hole and you really have to know it is there to see it. Sand weighs a lot, so a little bit of sand in each ornament is all you need. Plus this way you can sort of shake it like a snow globe (again important to seal up the top). The sand also makes it not a typical Christmas Ball in that you can set it down and it doesn't roll. It could of course be batted about by cats if they gave it a go.
It's lovely to see how different sands look up close. Oh to have some of the lovely black sand from Ms. Dunnit's recent vacation lol.
Learning my lesson from the first set of boxes, I scoured the local Hobby Lobby for six identical sheets of sturdier cardstock. I found the kraft cardstock was my best bet, and decided to just punch a little border with this EK Success beach punch. Wonderful except there was a little glitch in it that prevented the paper from cutting clean away so it had to be wrestled after each cut. At the end of the second strip I realized I had a Martha Stewart beach edge punch that might have been a little easier to use. See what happens when you put things away? I abandoned the idea of using a different ornament so I could use the same Gypsy file for the box (one of the boxes from the Cricut Wrap It Up cartridge).
I can't stress how much I love Inkessentials Glossy Accents for sealing the little holes in the ornament topper. Trust me, you need to seal them or you'll be saying as I did, why is there sand all over the table? I just put a little over each hole and you really have to know it is there to see it. Sand weighs a lot, so a little bit of sand in each ornament is all you need. Plus this way you can sort of shake it like a snow globe (again important to seal up the top). The sand also makes it not a typical Christmas Ball in that you can set it down and it doesn't roll. It could of course be batted about by cats if they gave it a go.
It's lovely to see how different sands look up close. Oh to have some of the lovely black sand from Ms. Dunnit's recent vacation lol.
Learning my lesson from the first set of boxes, I scoured the local Hobby Lobby for six identical sheets of sturdier cardstock. I found the kraft cardstock was my best bet, and decided to just punch a little border with this EK Success beach punch. Wonderful except there was a little glitch in it that prevented the paper from cutting clean away so it had to be wrestled after each cut. At the end of the second strip I realized I had a Martha Stewart beach edge punch that might have been a little easier to use. See what happens when you put things away? I abandoned the idea of using a different ornament so I could use the same Gypsy file for the box (one of the boxes from the Cricut Wrap It Up cartridge).
Labels:
Beach,
Christmas,
Cricut,
Gift,
Glossy Accents,
Martha Stewart,
Ornament,
Punch,
Souvenir,
Wrap It Up Cart
Sunday, September 12, 2010
A Card for Fall and a Thank You card
I made this card for a contest, which was timely as I had been wanting to try this all summer lol. The treetop is made from a fancy cut on Straight from the Nest and it's shadow. The paper is Creative Memories, but I don't remember which set. The card base is made with Core'dinations cut 5.5" x 8.5" and folded in half. The tree trunk is from Serenade. and it is sandwiched between the fancy cut and it's shadow. Please note rhinestones do not expire. I bought these from a now defunct store called Franks back in 1989. I filled all the cuts that have rhinestones in them with glossy accents. I also filled in some of the cuts without rhinestones.
Then I put the finishing touches on a Thank You card I've been working on all week. One of those get an element think about it, let it lie on the card for a while, move it lol.
It started with the flower embellishment which I cut almost 2 years ago when I was just starting out with the Cricut. I have NO idea which cart it came from or anything. Then I went to my scrap box and pulled out a thin strip of shiny K&Co paper and my favorite pink, preglittered paper, and a piece of cardstock from Club Scrap's Framed kit (this is the plain side). I cut the shiny paper strip in two and used both sides, and strung it through the flower.
The flower looked too plain, so I stamped it with a Papertrey Ink stamp from the Embellishments stamp set, and then covered the ink using a clear glittered copic marker (also purchased from Papertrey Ink). I used my Splash BazzInk cube to tie elements together by inking the edges of the grey mat and to stamp flourishes on the card base.
You can just see the background stamping there. Then I made liberal use of my Antique Linen Distress Stickles and a sentiment made from the Paper Tray Ink stamp set from Papertrey Ink.
Thanks for looking :D
Added: The flower is from George and Basic Shapes, in the slotted feature :D
Then I put the finishing touches on a Thank You card I've been working on all week. One of those get an element think about it, let it lie on the card for a while, move it lol.
It started with the flower embellishment which I cut almost 2 years ago when I was just starting out with the Cricut. I have NO idea which cart it came from or anything. Then I went to my scrap box and pulled out a thin strip of shiny K&Co paper and my favorite pink, preglittered paper, and a piece of cardstock from Club Scrap's Framed kit (this is the plain side). I cut the shiny paper strip in two and used both sides, and strung it through the flower.
The flower looked too plain, so I stamped it with a Papertrey Ink stamp from the Embellishments stamp set, and then covered the ink using a clear glittered copic marker (also purchased from Papertrey Ink). I used my Splash BazzInk cube to tie elements together by inking the edges of the grey mat and to stamp flourishes on the card base.
You can just see the background stamping there. Then I made liberal use of my Antique Linen Distress Stickles and a sentiment made from the Paper Tray Ink stamp set from Papertrey Ink.
Thanks for looking :D
Added: The flower is from George and Basic Shapes, in the slotted feature :D
Sunday, August 22, 2010
Pagoda Thank You Card
So my friend Flowerdisco issued a challenge to make a Thank You card using the Pagoda cartridge, and after some trial and error, I have come up with a card I like.
I put a lot of texture in this card. I used the debossed side of the cloud embossing folder from the Cuttlebug Plum Blossom set. I used glossy accents on the three roofs. The branch is glued to the cardstock on the left and dimensionals are used under the leaves.
The white cardstock is Papertrey Ink, everything else is from my scrap bin. The temple shadow is Papertrey Ink cream cardstock embellished with the chamomile ink pad. The sentiment is the Paper Tray stamp set from Papertrey Ink.
I put a lot of texture in this card. I used the debossed side of the cloud embossing folder from the Cuttlebug Plum Blossom set. I used glossy accents on the three roofs. The branch is glued to the cardstock on the left and dimensionals are used under the leaves.
The white cardstock is Papertrey Ink, everything else is from my scrap bin. The temple shadow is Papertrey Ink cream cardstock embellished with the chamomile ink pad. The sentiment is the Paper Tray stamp set from Papertrey Ink.
Labels:
card,
Cricut,
Cuttlebug,
Dimension,
Emboss,
Glossy Accents,
Pagoda cartridge,
Paper Tray set,
Papertrey Ink,
Plum Blossom
Subscribe to:
Posts (Atom)


