Saturday, October 16, 2010

Take THAT Cancer! Card

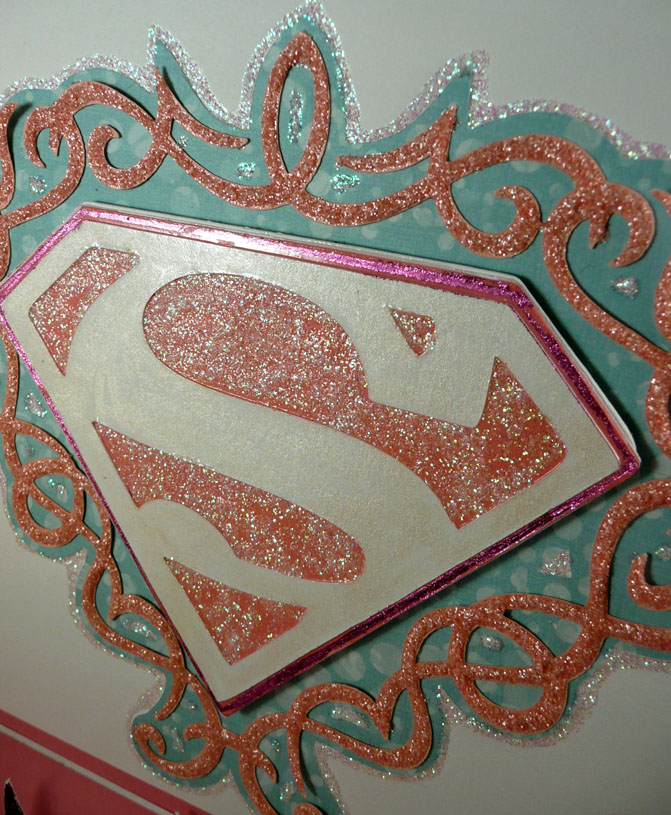
I made this card for Monique Griffith who just finished her chemo. It was one of those things I could see clearly what I wanted it to be, but it took me a while to get all the details down pat. It's a pedestal/easel/stand-up card that really stands up because I pushed the brace part back a bit. I didn't want the super emblem to be slacking. I learned how to make these cards last year at Everyday Cricut, before that I just over thought the whole process.

Paper: Stamper's Select White (card face most of the "S", one layer of the brace and both layers of the zap base) and Hibiscus Burst (card base one layer of the "S") and from Papertrey Ink, and some light pink, maroon and blue scraps from my scrapbox.
Cricut cartridge: Superman (including the font).
Foil: Martha Stewart from the foil kit.
Embellishments: Crystal and Cotton Candy Stickles, Pearl Ex Powder.

Starting with the Icon, I cut the shadow out of some blue scrap and glued embellishment layer (cut out of some pink scrap cardstock paper) to the shadow but not glued everywhere. I wanted the stickles to lift it up a bit where it wasn't glued down. I used two heavy layers of Cotton Candy Stickles for this.

After I was sure that was what I wanted I glued the blue shadow to the white cardstock and outlined it and all the openings in it with Crystal Stickles.The white part of the icon is covered with white Pearl Ex powder. The Hibiscus Burst background is coated with Crystal Stickles and edged with Martha Stewart Foil. I made two more icon bases to make sure it wouldn't warp. Then the whole icon was covered with Triple Thick Gloss Glaze by DecoArt and attached with foam tape.

The shadow layer of the mat is cut from Stamper's Select White cardstock by PTI covered with Martha Stewart foil. The smaller layer is the same cardstock covered with Crystal Stickles. The shadow of the Zap! is cut from the same pink as the Icon embellishment. The word is cut from maroon. I used a Sakura Quickie Glue pen to draw a Zap inside the cut and covered it with the Martha Stewart foil. I used a lot of foam tape to put everything together.

Thursday, October 14, 2010

Think Pink


I made this card to for the Cricut Circle Think Pink Challenge. The card base is made with Papertrey Ink Fine Linen cardstock.  The butterflies are Papertrey Ink Hibiscus Burst cardstock made with a Martha Stewart punch. The two Cricut cuts are the scallop border from Plantin Schoolbook and the negative from Serenade image 35. The flourishes are stamped on the kraft paper with a stamp from the Papertrey Ink Embellishments stamp set (also used for the sentiment). I used Crystal Stickles for the butterfly bodies. I drew the frame, the leaves and outlined the tree with a Micron pigma black 01 pen.

Wednesday, October 13, 2010

Playing with Serenade by Flowerdisco and Friends Week 5

OK, I don't know where the week went, but jeepers it was a fast one. The base of the card is made with Papertrey Ink's Ocean Tides cut as an A2. The tree is cut with scraps, mostly Club Scrap. I intended to use "I be-leaf in you" as the sentiment, but I wasn't sure when it came time, so I left it blank for now. I can always add it later, but it's a bear to change once it's on :D.

Be sure to check out what everyone else made!

1. Abby- http://www.scrapbookaholic.blogspot.com//

2. Agnes- http://flowerdiscosscraphut.blogspot.com/

3. Gaby- http://gabycreates.com/

4. Helen- http://craftingcricutmom.blogspot.com/

5. Jessica- http://luvcraftingwithcricut.blogspot.com//

6. Melissa- http://melissaward72.blogspot.com/

What's on Your Workdesk? Wednesday - 71

This week just flew by.  I have the remnants of my Playing with Serenade by Flowerdisco and Friends contribution for this week left on the table along with my acrylic blocks and some rubberstamps from my ongoing stamp book projects. I have one page set aside solely for Eiffel Tower stamps. I'd have a gnome page, but I only have one very small gnome stamp, so it would look a bit lost. I've been saving my new Tim Holtz rosette die for an incentive for finishing a few things. So after I write up my instructions for my "Take THAT Cancer" easel card, I get to make rosettes :D. I'll have a full post on it sometime, but it seemed like I should show you all since there's been hints and bits of it for a couple of weeks now.

This is the card I've been working on finally finished (see why I needed to find that foil?). Lots of stickles, pearl ex powder, foil and triple thick glaze. I'm thinking of entering it in the Woman Warrior contest. I was tickled pink that it really seemed to bright the recipient's day. All the cuts and lettering are made with my Cricut Superman cartridge.

I'm trying to tweak just a little bit more length out of the coffin boxes, then I have an order for 12 to put together. *tutting at myself* I almost forgot to say if you are wondering what WOYWW is, or you'd like to see more head over to Julia's blog at Stamping Ground.

Tuesday, October 12, 2010

Auntly Pride

When my niece graduated I photographed this little celebration made for her by my youngest nephew. Now that I'm back on my regular computer (and it feels so strange not to be sitting on the sofa whilst I surf), I'm sorting through pictures. We're thinking an etsy shop is in his future :D.

Wednesday, October 6, 2010

What's on your workdesk? Wednesday - 70

If you are looking for Playing with Serenade by Flowerdisco and Friends, please scroll to the next post. Of course you are welcome to read this one too lol.

OK, I'm late to play today. To the untrained eye, my workspace might look the same as last week. But this week, it's missing the layers of yore. Anyhoo, the sort of florally looking pink punch is the punch for medium i-Tops (see yesterday's post for the items made with this lovely).  Also showing is the pink crop-a-dile I'm using to make a necklace (3 squares). This is on top of my stamp project page for futurama /space stamps. Those are some marvelous jetsonesque transportation devices.  What's significant is what is *not* on my desk :D.

I went to the local overstock store and bought this shoe holder, only I'm using it to store my favorite punches (mostly circles, scallops and martha stewart border punches) and my Club Scrap Idea Card Decks so far. To the left you can see negative cuts from my Cricut held together with painter's tape until they find a home.

If you want to see more workspaces captured in a Wednesday frame of mind, head over to Julia's Stamping Ground blog. Or even better, take a picture and join in the fun :D.

Playing with Serenade with Flowerdisco and Friends - Week 4


It's week 4 already! The lost camera has been found  and recharged (yay).  This week I turned one set of Cricut cuts into two cards by layering the positive and the negatives.  I used the new Papertrey Ink Linen cardstock as the base of both cards, cutting one 8.5 x 11" sheet in two. All the cuts are made from Club Scrap paper from some Pounds of Paper I bought on sale awhile ago. And there is a lot of dimension to both cards with either glue dots or foam tape being used almost everywhere. The sentiment is made with Papertrey Ink's Simple Alphabet stamp set.

The first card is made with positive shapes. The tree branch is stamped with Papertrey Ink's Beyond Basics: Woodgrain stamp set. The sentiment is stamped on a tag tied to the branch. The embellishments are made with Dimensional Pearls.

The second card is made with the negative shapes of the shadow and base stacked over a green base. The edges were inked with Papertrey Ink Chamomile and Chai.
Be sure to check out what everyone else made!

1. Abby- http://www.scrapbookaholic.blogspot.com/
2. Agnes- http://flowerdiscosscraphut.blogspot.com/
3. Gaby- http://scrapabookaholic.blogspot.com/
4. Helen- http://craftingcricutmom.blogspot.com//
5. Jessica- http://luvcraftingwithcricut.blogspot.com/