Wednesday, September 24, 2014

WOYWW 277


I've been busy, but I re-charge by stamping out sets in various places, Get Well, Encouragement, Miscellaneous, etc. I love love love the Tim Holtz grid blocks. I've also made a big dent in my stack of unmounted stamps, I believe I'm down to five. I've also been peeling foam backing off a lot of ones I did years ago and replacing it with Aleene's Tack It Over & Over glue.

I had a bit of a scare on Friday, my right hand decided not to co-operate for about a minute.Which required a trip to the hospital for a couple of scans. They aren't sure what happened. I decided not to let that put me off crafting though, and I came up with the following cards earlier this week.

Puppet in a card. With a tutorial on how I change a stationary image into a moveable one. I was especially pleased with this one.

Eileen Fahleens aka Iron Filings. Another favorite with handy dandy construction hints. They both went into my slew of monsters gift bag for one of my friends.

To see more crafty spaces, head over to Julia's Stamping Ground and have a gander at crafty desks around the world.

Sunday, September 21, 2014

It's a Bird! It's a Plane!

It's Super Monster! Simon Says Rock the Technique, and this is one of my favorites. Converting a stationary stamped image into an moveable one. The card is made with Papertrey Ink cardstock. Stamper's Select White for the A2 base. Blueberry Sky for the mat, die cut with the cloud from the Stamp-a-faire 2014 1980's mini kit. One cloud is painted with Picket Fence Distress Paint. The shrub pieces are all hand cut. The large part of the shrub is glued directly to the card.  The other two are attached with foam tape. The gnome is a brad from Eyelet Outlet.

It's also a puppet.

The dimension of the shrubbery hides the puppet slot. I sprayed her with Dylusions Spray after all the pieces were cut.

The foam channels are three pieces high. There is a stopper and two sides.

Stamp your image several times.  And start cutting rounded pieces.  It's better to start with too much on the piece as it can always be trimmed later.

I use a paper piercer to pivot the pieces and swivel marking where the cuts will go.

Poke holes where the brads will go (I used Tim Holtz Mini Brads).


Saturday, September 20, 2014

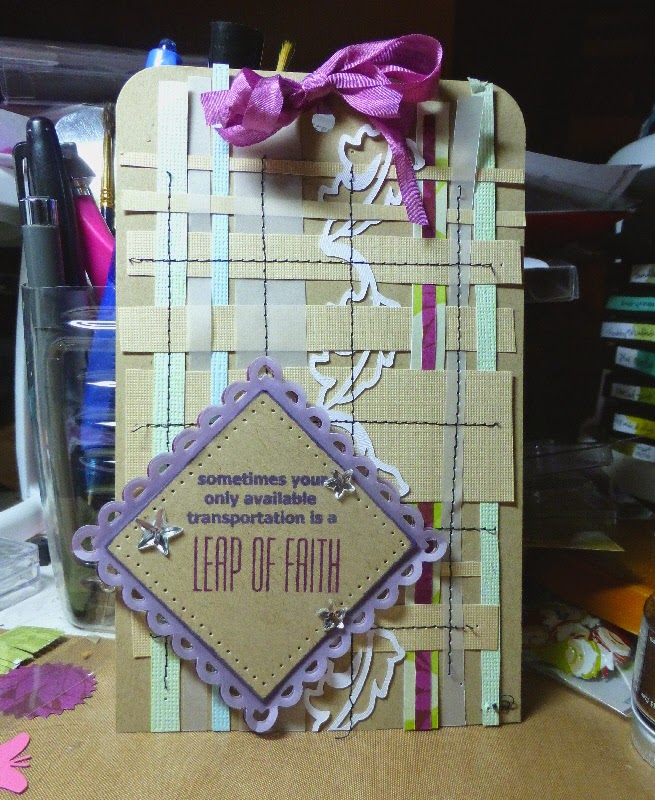
Paper Weaving

A tag with paper weaving.  The Papertrey Ink Make It Monday#180: Paper Weaving and Simon Says Tag It.

I wanted to use the border cut and a double layered in my weaving, so the rest of the strips I chose were softer hues cardstock and white vellum. I taped all the ends to a piece of Classic Kraft cardstock and then started to weave. The side to side pieces were all the same cardstock and I didn't have a lot of it so I stitched every thing down.

Since the challenge at Simon Says is Tag, I used my 1/2" side of the Corner Chompers and a standard hole punch and voila a tag.

I was heavily influenced by Melissa Phillips post on layering with vellum for the focal point, using two layers of purple vellum over the Classic Kraft cardstock die cut with Papertrey Ink's Limitless Labels 2 1/4 square die set and inked with Seedless Preserves Distress Ink. The square is edged with Dusty Concord Distress Ink, edged with paper piercing and stamped with a two part stamp from Papertrey Ink's A Little Inspiration stamp set (in Seedless Preserves and Dusty Concord). With a few Mirror Stars from Tim Holtz' Ideology. The bow is Papertrey Ink silk ribbon dyed with Seedless Preserves spritzed with water on my craft mat.

Kick Ass Gift Bag Tutorial

I'm really quite pleased with the gift bag. In this case it's a brown paper lunch bag. Fold the bottom of the bag so it looks like an upside down "y" (so the front and back are both the same).  With a fold (vary the fold height with content), measure paper to the width of the bag and up to the fold line (repeat for back). Then measure paper for the fold. I used my ATG to adhere all the pieces.

A closeup of the badge (another tutorial on badge making will follow soon). Additional things can be pinned to the ribbon tails if you've a mind to do so. The stamps are from two of Kelly Purkey's Simon Exclusives, F Bomb and Like a Boss. The rosette is from the Tim Holtz Rosette die.

I'm not sure why the pin-back photographed so curvy, but take my word for it that it is actually straight. I used an standard hole punch to allow the ends to go through the top of the back easily.

Here's my favorite practical bit, a pocket for the card.  Just make a pocket using your favorite technique and attach it to the back. Keeps the card with the gift easy peasy (lemon squeezey).

Wednesday, September 17, 2014

WOYWW 276

I'm working on a new iron filings project, this time with shaker pouches from Impression Obsession. I bumped the pouch slightly and iron filings stuck to the adhesive they come with, but Glossy Accents sealed them in impressively. In the back are two "Badges of Encouragement".

Someone had mentioned they wished they could see some of the kinetic things in action. I'm trying to work out how to film some of the cards, but in the meantime Eileen Fahleens is in the house.  The sound isn't a loud as it seems in the video, but it is noticeable.

I've worked out a way to make mouths from a circle die cut/punch easy peasy.There is also a link to the Attack of the Killer Tomatoes theme song at the post lol.

I won a free set of stamps from Waltingmouse with a random drawn comment. I chose Off Beat Backgrounds, what a hoot! I made this background with the grid stamp in seafoam and the dots in Shaded Lilac.

To see more crafty spaces, head over to Julia's Stamping Ground and have a gander  : ).

Sunday, September 14, 2014

No One Expects

Killer Tomatoes! Traditionalists may think "No One Expects" should always be followed by "the Spanish Inquisition" (Monty Pytyhon skit). What can I say? I'm a rebel : ).

This week's CASology cue card is Three. One of my favorite movies is Attack of the Killer Tomatoes (I even have a special edition DVD with a packet of Killer Tomato seeds).  The tomatoes are Punny Produce: Tomatoes by WPlus9, colored with Memento Dual Markers (Lady Bug and Bamboo Leaves, with Summer Sky for the shading at the bottom of the card. I gave one of them Googly Eyes.

I had an epiphany when I was figuring out the mouths.  I used a 1/2 in circle punch. cut off part of the bottom, and then cut the negatives of teeth. It's best with paper or very thin cardstock.


If you're curious about the movie, the theme song has been posted on You Tube : D.

Feel Better Soon


Simon Says Make your own background.  The background is stamped with Off Beat Backgrounds from Waltzingmouse (which I won in a random draw for commenting!) First I stamped the grid pattern with Sea Foam Marvy Heritage. Then I stamped over that with the dots with Shaded Lilac Distress Ink.

The hydrangea from the Because I Care Stampin' Up stamp set is painted with Mowed Grass and Shaded Lilac Distress Inks and then fussy cut.

I used Jade Velvet Ribbon with 0.25 Score Tape. The sentiment is from Papertrey Ink's Inside & Out: Well Wishes stamp set stamped with Seedless Preserves Distress Ink.